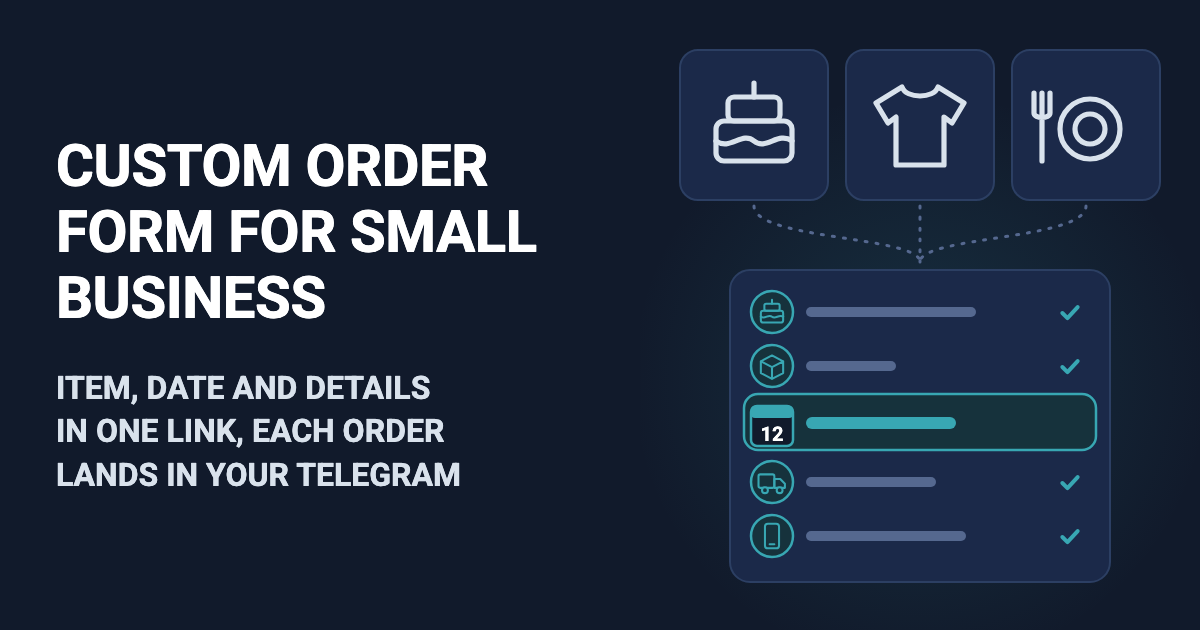
A birthday cake for Saturday, 40 shirts for a charity run, lunch for 30 people on the 12th. Orders like these come in by phone, Instagram message and email, and the date may turn up only in the third message. A custom order form gives a small business one link where the customer answers everything at once: what they want, how many, the date, pickup or delivery, the details and a phone number. In Easy Post the order form is an ordinary web page, so customers need no app and no account, and each order reaches your Telegram as one message.
The form collects answers and nothing more. It shows no prices, adds up no total, takes no payment or deposit, and has no idea how many cakes you can bake in a week. Each order that arrives is a request, and it is booked once you call the customer and agree on the price and the date.
Orders reach you in Telegram and under Submissions on the Easy Post site, with no email alerts, so you need Telegram on your phone; your customers never do. Prices, a total, payment, a cap on orders per week and email alerts are not part of the form today; they can be built as an add-on or as custom work on top of it: describe what you need on the support page. The Google Forms comparison covers how the form differs from a Google Form.
Where to start
- Sign in to easy-post.app with Google. On the first screen, "What do you want to receive?", press "Orders". Easy Post builds the form from the Order with Delivery template in Easy Post at once, and the template covers pickup too. The pipeline page opens; a pipeline is your form together with the orders it collects. It has a yellow "Still to do" panel, a block called "Where people send submissions" below it, and three buttons at the top: "Form" for the questions and texts, "Submissions" for every order, "Edit" for the pipeline's name.
- This step links your Telegram, so that orders reach you there. In the yellow panel, press "Test the form in Telegram". Telegram opens with the Easy Post bot: press Start at the bottom of the chat, then the "Start" button under the greeting the bot sends back, and the first question arrives. Answer as a customer would ("No comment" skips the last question). A message with your answers, called the order card below, arrives in the same chat, and the pipeline page says "The form works: your test submission came through." If Telegram is only on your phone, sign in to easy-post.app on the phone and do this step there.
- After the card the bot sends two more messages; leave both alone. "Send the form" shares the bot's link, which makes customers open Telegram; you will give them a web link instead. "Choose a channel" would start publishing your orders, addresses and phone numbers included, in a Telegram channel. Skip "Add a channel if you want to publish" in the yellow panel for the same reason.
Start from the order template →
Turn the order form template into your own
Press "Form" to open the form settings. The template asks seven questions, in this order: "What would you like to order?", "How many?", "Delivery address:", "When should we deliver?", "How will you pay?", "Phone number for the courier:" and "Anything else?…". Each has a frame with a "Field name, shown only to you" box (the label on your order card), a "Type" menu, a "Required" checkbox, a "Bot prompt" box (the question customers read) and, for Buttons, a box for the choices, separated by commas. Whatever you sell, change four questions and add one:
- "When should we deliver?" Change its Type from "Buttons" to "Date", its field name to "Date", and its prompt to one with your notice period: "What date do you need it? We need at least 5 days." Customers pick the day from a calendar that accepts any day, even a past one, so the notice period works only if they read it. The hint that appears under the Type, "User types a date, in any form. It is not checked.", is about the bot; on the web page the question is a calendar.
- "How will you pay?" You agree on payment during the call, so turn this question into "Pickup or delivery?" with the choices "Pickup, Delivery" and the field name "Pickup or delivery". Then press the up arrow on the left of its frame twice, so it comes before the address.
- "Delivery address:" Untick "Required" and change the prompt to "Delivery address (skip if picking up):".
- "Phone number for the courier:" Keep it required, with the prompt "Phone number (we'll call to confirm):". An order from the web page carries no name and no account, so this number is how you reach the customer. The Phone type refuses email addresses.
- A name, which the template does not ask for. Press "+ Add Field" under the questions. The new question appears last and optional: type "Name" as its field name and "Your name:" as its prompt, keep the Type "Text", tick "Required", and press its up arrow once, so it sits after the phone question.
Above the questions, the "Form Name" box is labeled an internal name, but it is also the heading of the page customers open, so type your business name there, for example "Rosa's Print Shop: custom order". Then press the "Save" under "Submission Settings", further down the page. Avoid the "Save" in the "Web form" box at the very bottom: it saves only that box and drops your other changes. A green "Form settings saved." line at the top means it worked. If it does not appear, a new question probably has no field name, and the edits since your last Save were not kept: fill in the field name and make those edits again. Saving after each few changes keeps that small.
The order card starts with "New submission in" and the pipeline's name, which is also "Order with Delivery". Press "Edit" at the top of the pipeline page, type your business name in "Pipeline Name" and press "Update Pipeline". The site then opens your project page; click the pipeline's name there to get back.
Order form fields for a bakery, a T-shirt shop and a caterer
The three remaining questions, "What would you like to order?", "How many?" and "Anything else?…", depend on what you make. A customer picks one choice per Buttons question, and a comma inside a choice splits it in two: write "1500", not "1,500". New questions come from "+ Add Field" and start optional, which suits the extras below.
Bakery and custom cake order form
- "What would you like to order?": choices "Round cake, Sheet cake, Tiered cake, Cupcakes, Cookies, Other".
- "How many?": prompt "How many people, or how many dozen?", choices "Up to 10 people, 11 to 20 people, 21 to 40 people, 1 dozen, 2 dozen, 3 dozen or more", field name "Size".
- "Anything else?…": prompt "Flavor and filling, or what you have in mind if you picked Other:", field name "Flavor". Tick "Required".
- Two new Text questions: "Message on the cake (exact words):" with the field name "Message", and "Allergies or ingredients to avoid:" with the field name "Allergies". As separate questions, the inscription and the allergies cannot get lost in one long answer.
- A new Photo question: field name "Photo", prompt "A photo of a cake you like (optional):". Customers can attach up to 10 pictures, JPEG, PNG or WebP, 10 MB each.
Photos never reach Telegram, and the order card does not even say that one was attached. Before you call about a cake, open the order under Submissions, where the picture sits below the answers. When the set is done, press the "Save" under "Submission Settings".
T-shirt order form
- "What would you like to order?": choices "T-shirt, Hoodie, Tote bag, Other".
- "How many?": a size run needs several numbers in one answer. Set the Type to "Text", the prompt to "How many of each size? For example: S 4, M 10, L 6" and the field name to "Sizes".
- "Anything else?…": prompt "Shirt color, print colors, where the print goes (front, back, sleeve):", field name "Details".
- A new Photo question: field name "Design", prompt "Your logo or design (optional):". The page takes JPEG, PNG and WebP pictures only, no PDF, AI or SVG files, and keeps a re-saved copy of each. That is enough to see the design; ask for the print file by email.
- A new Text question: field name "Email", prompt "Email for the proof and the invoice:".
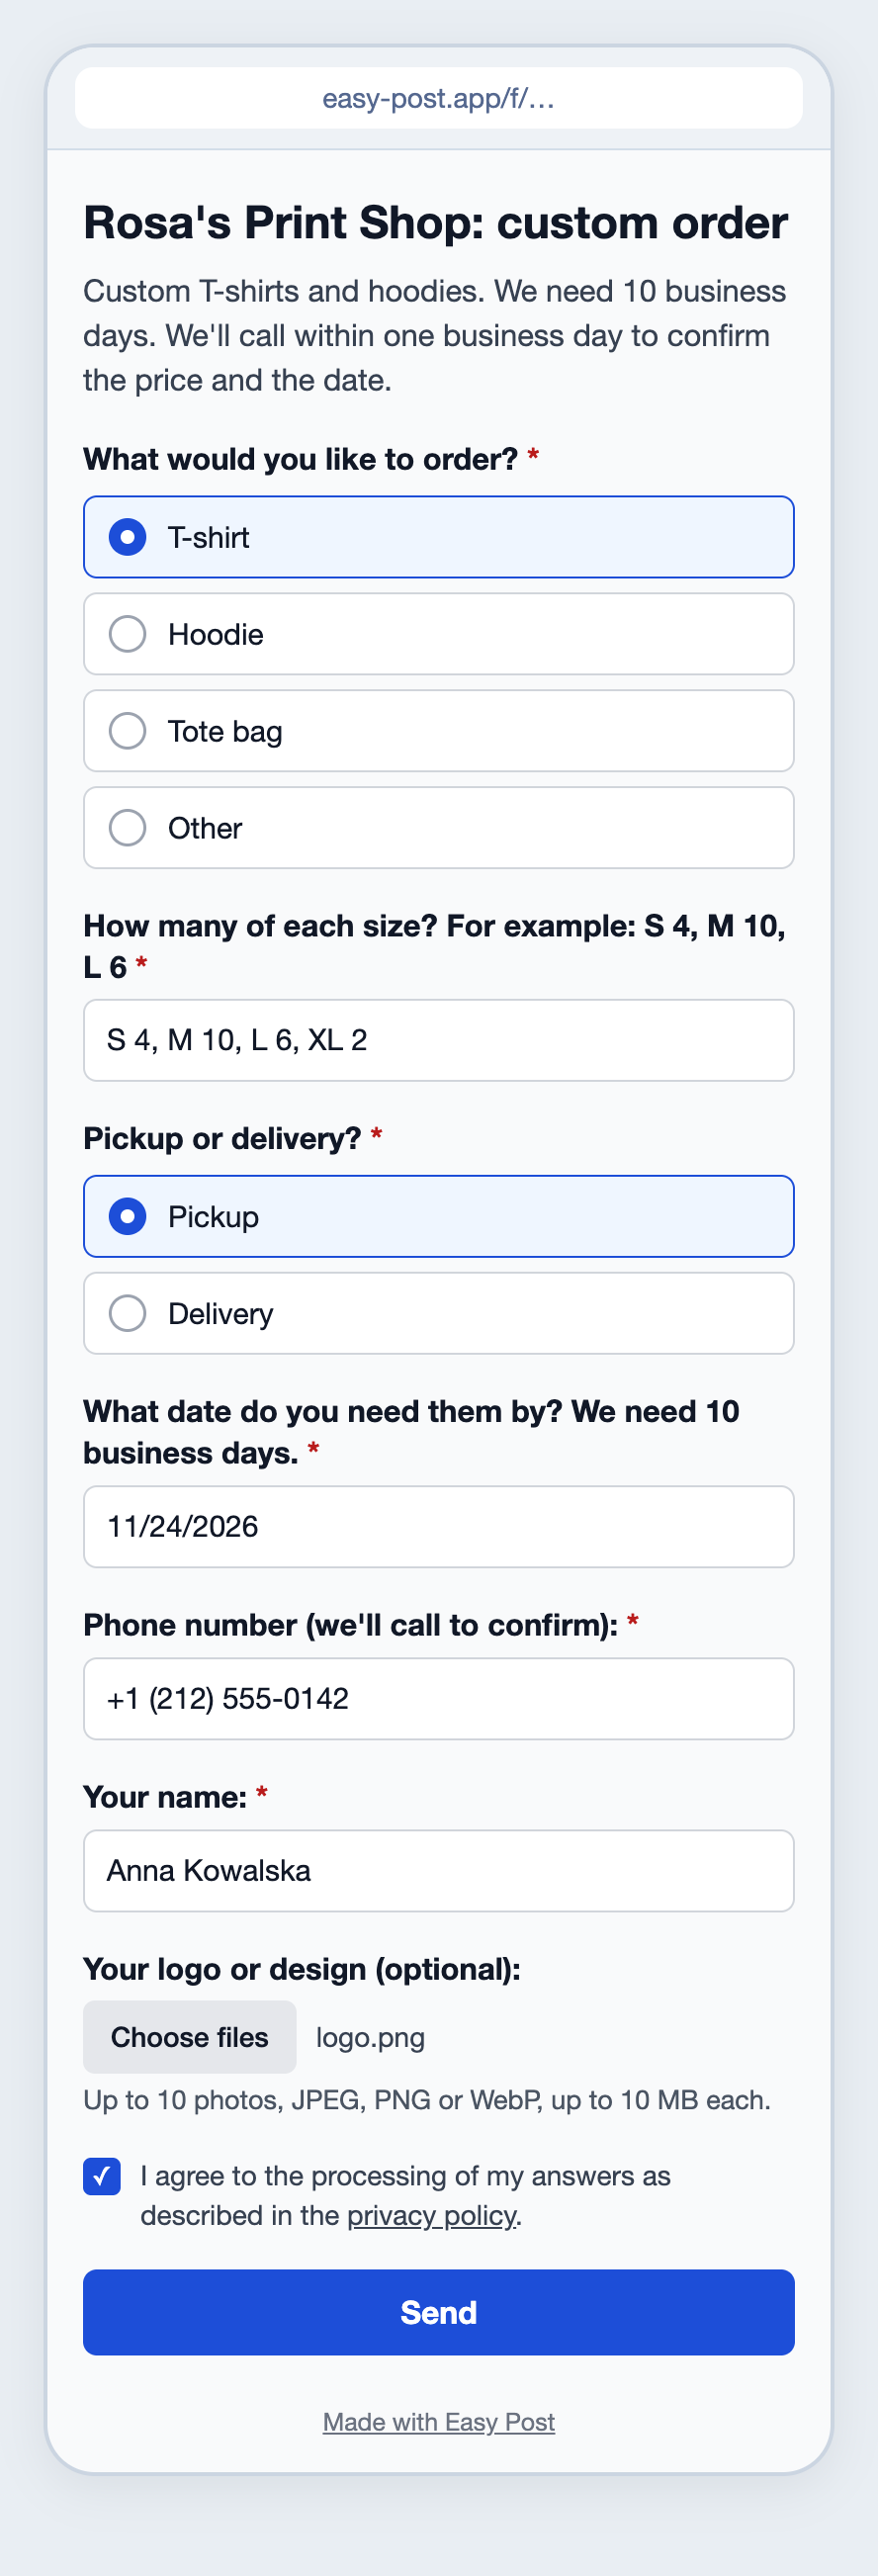
Illustration: the page's own texts are Easy Post's, and the form owner writes the questions and choices; some questions are not shown; names and data are made up.
Catering order form
- "What would you like to order?": prompt "Which menu?", choices with your packages, for example "Taco bar, BBQ, Sandwich platters, Breakfast, Other", field name "Menu".
- "How many?": set the Type to "Number", the prompt to "How many guests? Numbers only." and the field name to "Guests". The Number type takes "40" and answers "about 40" or "40 people" with "Please enter a number."
- "Delivery address:": prompt "Event address (skip if picking up):".
- "Anything else?…": prompt "Serving time, dietary needs (vegetarian, gluten-free, allergies):", field name "Details". The form has no question type for a time of day, so the time goes here.
Pre-order form: a second form for pickup days
Run pre-orders, such as Thanksgiving pies, as a second form, so your custom-order form stays as it is. Press "+ New pipeline" at the top of the pipeline page, pick "Order with Delivery" again and name it, for example "Thanksgiving pies". How many pipelines you can have depends on your plan, and that page tells you if there is no room. The new pipeline has its own settings, link and QR code; its orders reach the same Telegram chat under its own name. Set it up as above, except:
- "When should we deliver?": keep it as Buttons. Change the prompt to "Which day will you pick up?", type your pickup days as the choices, for example "Tuesday Nov 24, Wednesday Nov 25" (no comma inside a day), and name the field "Pickup day".
- "What would you like to order?" and "How many?": give each kind of pie its own Number question, such as "Apple pies: how many?" with the field name "Apple" and "Pumpkin pies: how many?" with the field name "Pumpkin". Untick "Required" on both, and add more kinds with "+ Add Field". Every order then lists a number per kind.
- Pickup only? Then skip the "Pickup or delivery?" change for this form: delete "How will you pay?" and "Delivery address:" with the × in the corner of each frame. The yellow note "No field matches" that appears is about posting to a Telegram channel, which this form does not do, so you can leave it.
- Write this form's own Welcome Text and Completion Text (next section), with the last day to order in the Welcome Text, for example "Thanksgiving pre-orders close Sunday, November 22."
- Switch on its web form: a pipeline made with "+ New pipeline" starts with the "Web form" card off (see below).
Easy Post does not add up the pies, stop at a number or close the form on a date. The "All" tab under Submissions counts the orders; add up each kind yourself. On the last day, press the switch on this pipeline's "Web form" card (see below). The link then opens a "Page not found" page with a button to the Easy Post homepage, so swap the link in your bio and on your site that day. If your bio has room for one link, use the pre-order link until the cut-off, then put the custom-order link back.
The page takes 120 sends an hour per form; past that, customers are asked to try again later, with their answers kept.
Tell customers the order is not booked yet
Below the questions, "Bot Messages" holds two texts that customers also read on the web page. The "Welcome Text" sits under the page heading, and its default, "Welcome! Press the button to submit your entry.", is written for the bot's Start button. Replace it, for example:
Custom cakes for any date at least 5 days away. Tell us what you'd like, and we'll call you within one business day to confirm the price and the date.
The "Completion Text" appears after the customer presses "Send". Its default, "Thank you! Your submission is awaiting review.", does not say who gets in touch or when. Say both, and say the order is not booked until then:
Thank you! Your order is not booked yet: we'll call you within one business day, between 9 am and 6 pm, to confirm the price and the date. If you see a "Find out the result in Telegram" button, you can skip it.
A T-shirt shop can add "Email your print files (PDF, AI or SVG) to orders@example.com." Put in your own hours, then press the "Save" under "Submission Settings".
Under your text the page adds a line and a "Find out the result in Telegram" button that you cannot remove. Your form has no approval step, so a customer who presses it gets one reply from the bot, "Done. You will get a message here when your submission is reviewed.", and nothing more; your Completion Text has already told them to expect a call.
Build your custom order form →
Put the order form on your website and Instagram
In "Where people send submissions", the "Web form" card should say "On · taking submissions": a pipeline made from the first screen starts with the form on. If it says "Switched off" (a pipeline made with "+ New pipeline", like the pre-order one), press its switch; it saves at once. The card then shows "Link to the form", the "Copy link" and "Open the form" buttons, and two folded sections, "QR code" and "Code for your site". Take links from this card, or from the "Copy the web form link" button in the yellow panel after your test: the other two "Copy link" buttons, on the "Telegram bot" card and in the yellow panel, give the bot's link.
Test before you share. Press "Open the form", send yourself an order and check that its card arrives in Telegram. The test closes the yellow "Still to do" panel, which is expected. Then delete your test orders under Submissions with "Delete", and only after that put the link out:
- For your website, open "Code for your site", press "Copy code" and paste the code into an embed or HTML block on your order page. To stop other sites from showing it, list your site under "Sites where the form may be embedded" at the bottom of the form settings and press the "Save" in that box; this is optional.
- For an Instagram bio, a Facebook page or a reply to "Can I order a cake for Friday?", paste the link from "Copy link".
- For the counter, packaging and flyers, open "QR code" and press "Download QR code". You get an SVG file, which prints sharp at any size; if your printer cannot open it, print a screenshot of the code.
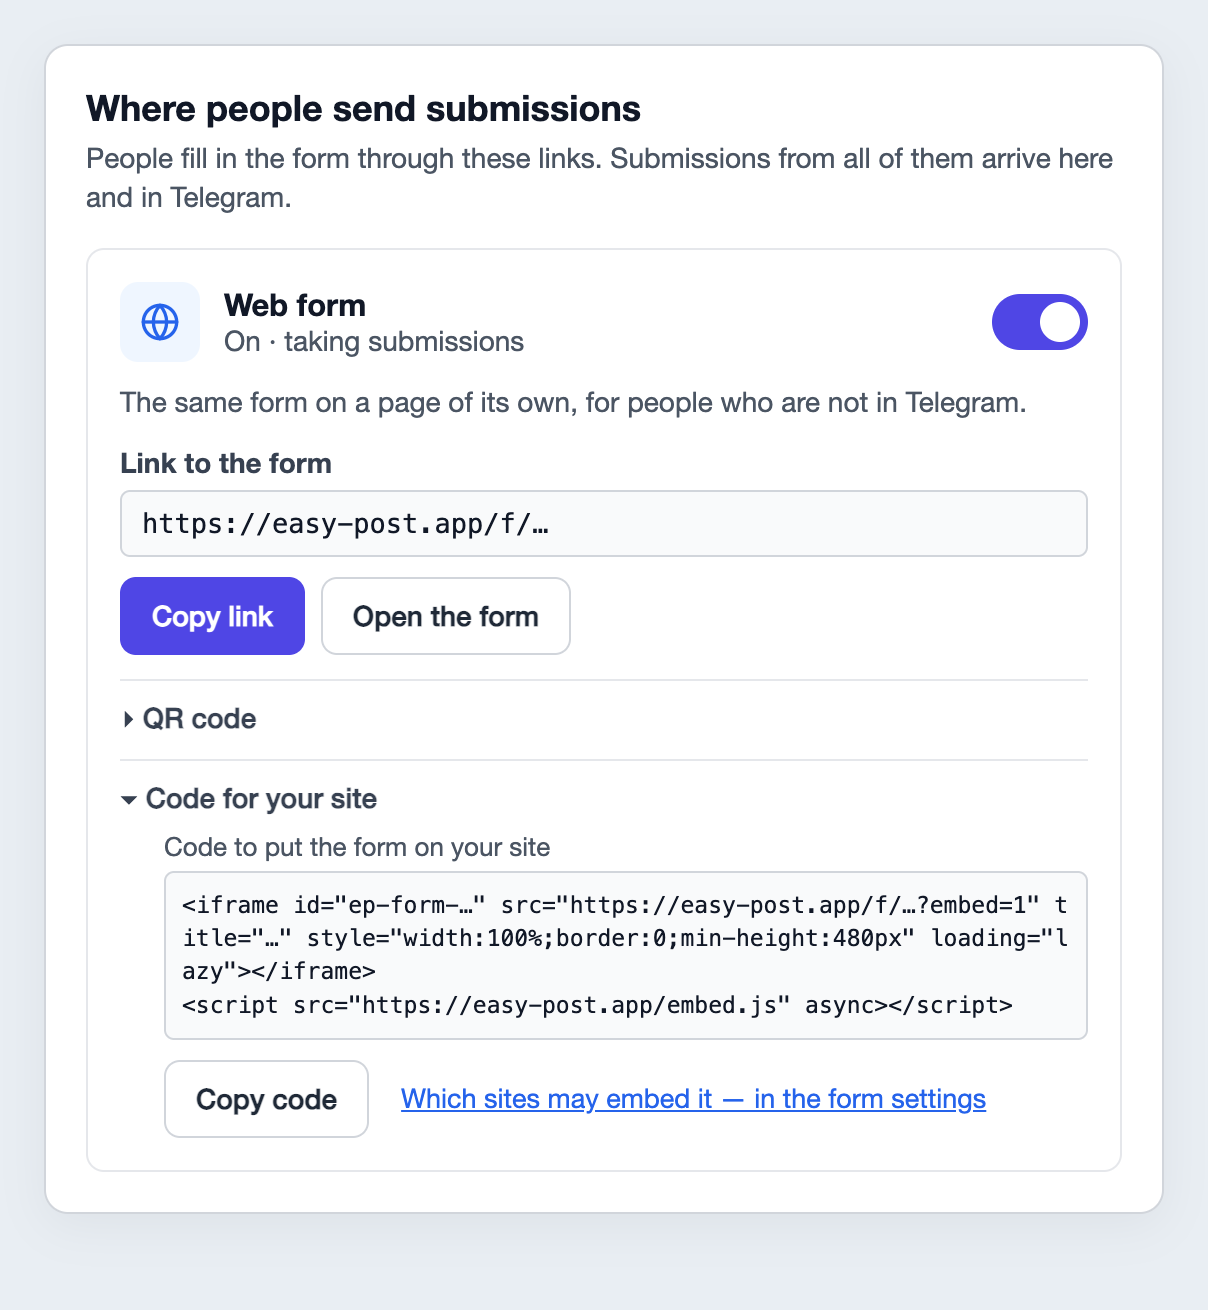
Illustration: the texts are the site's own; the link is a placeholder; the Telegram bot card and the plan note are left out.
On some plans the page shows "Made with Easy Post" at the bottom, and the "Web form" card says which plan removes it.
If you also share the bot's link from the "Telegram bot" card, three things work differently there. A choice longer than about 50 characters stops the bot from showing its question. Dates are typed as text and not checked. Optional questions get a skip button, which on the template's last question still says "No comment"; change it under "Button and error texts" below that question.
Call to confirm each order
Each order card shows "New submission in" and your pipeline's name, the line "Saved in your dashboard" (the order is in your Submissions list), your field names with the answers and, in place of a customer's name, "🌐 Sent through the web form". It has no buttons, because nothing in Easy Post waits for your decision. You call the number, agree on the price and the date, and take a deposit your usual way if you ask for one.
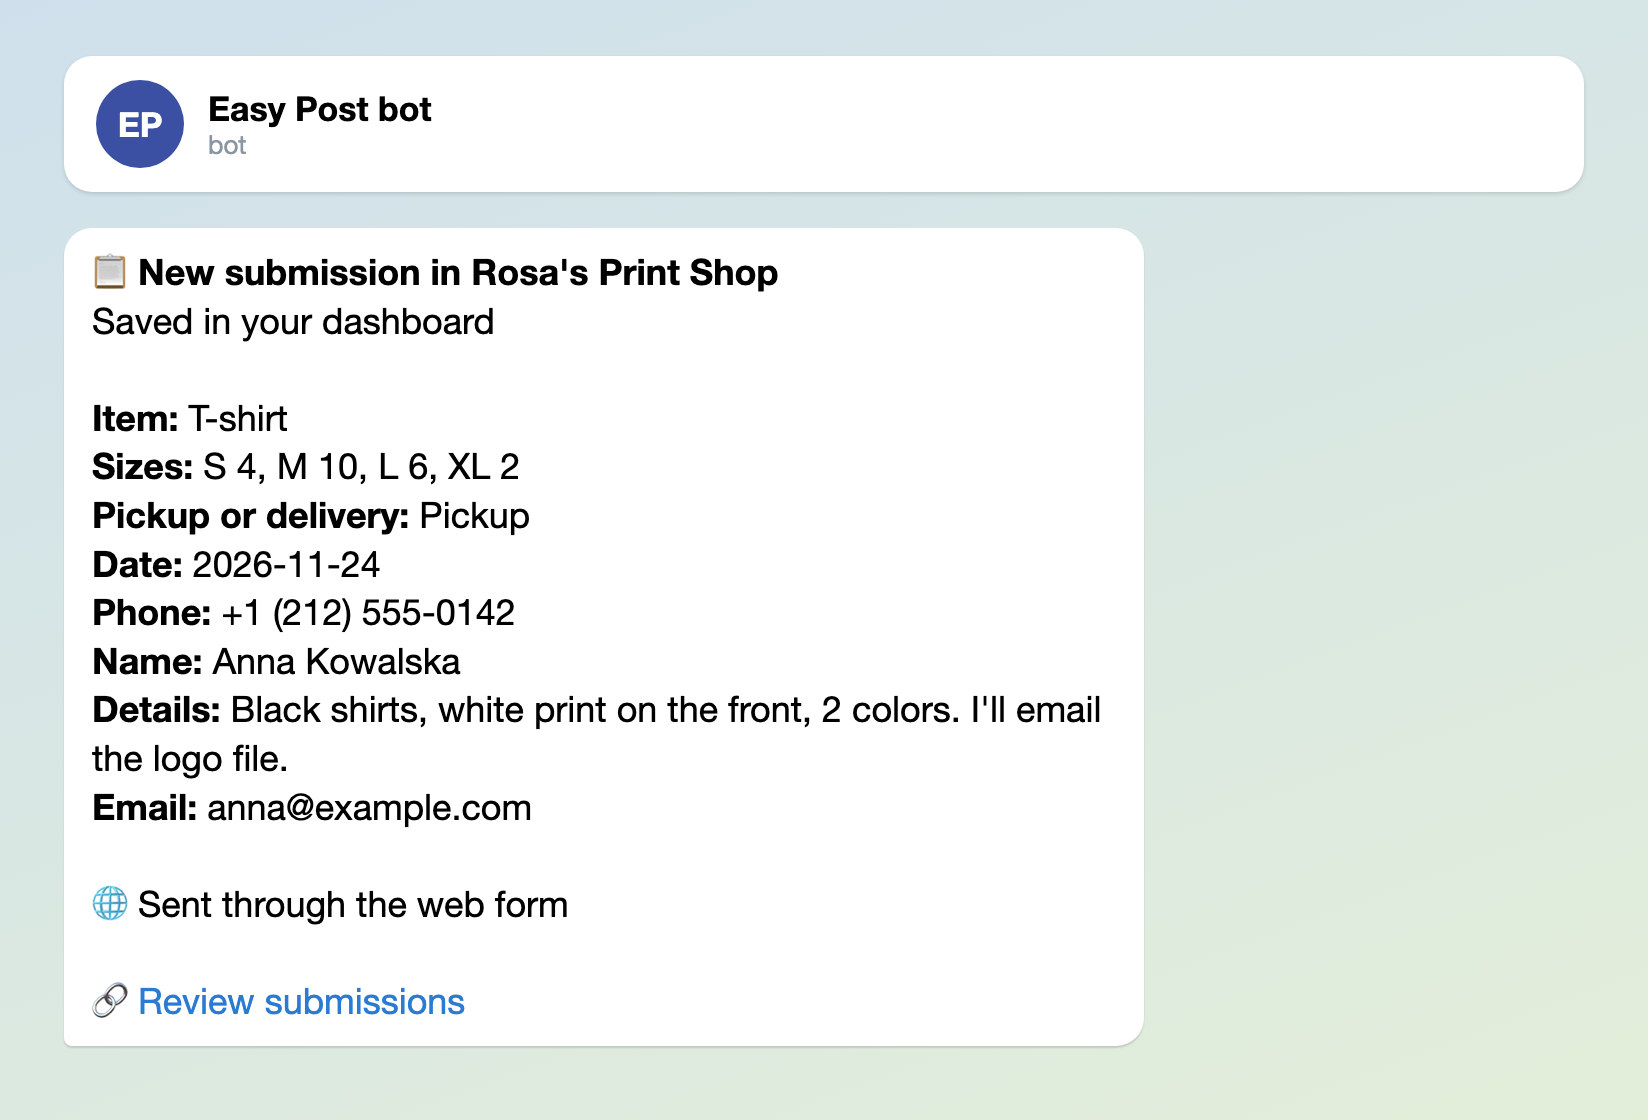
Illustration: the texts are the bot's own, and the field names are the ones you set; names and data are made up.
- The date reads year, month, day: 2026-11-24 is November 24, 2026.
- "Review submissions" at the bottom of the card opens your Submissions list on the site. There is nothing to approve there.
- Each answer on the card stops after 300 characters; the full text is under Submissions.
- Submissions keeps the template's original names for its own questions, so your date appears as "delivery_time", the pickup choice as "payment" and "Flavor" as "comment". Questions you added show under their field name in lower case, such as "name" or "message", and a photo appears as a picture below the answers.
- Every order under Submissions is marked "Approved", which only means it arrived. Leave the "Approve" and "Reject" actions there alone: a customer who pressed the Telegram button would get a message about them.
- No cards arriving means your Telegram is not linked: press "Test the form in Telegram" in the yellow panel or, once it has closed, "Link Telegram Account" on the pipeline page or in your Profile.
Easy Post has no order statuses of your own, such as confirmed, paid or ready, no calendar view and no export to a spreadsheet, and it does not see your other bookings: two customers can pick the same Saturday. When you confirm an order, put it in your own calendar on its date.
Other forms for similar jobs: lead form, service request form and quote request form. All forms are listed by job in the guide to forms in Telegram.
If the price depends on the job and you send a quote before anything is booked, the quote request form guide fits better. Booking time slots rather than orders? See the booking bot for salons. New to Telegram bots? How to create a Telegram bot without code explains the basics, although this setup needs no bot of your own.