A service request form is a page or a bot where a client answers your questions: what needs doing, where, when and how to reach them. Some businesses call it a customer request form. Without one, you pull the same answers out of a chat ("what's the address?", "when suits you?", "which number should I call?"), and while you are asking, the client may message someone else. If you are looking for your bank's service request form, for a chequebook or a statement, the bank has it on its own website or at the branch.
A service request form needs as many questions as it takes to quote a price and a time on the first call. An extra question can make a client give up halfway through, and if a needed one is missing, you have to call back and ask again. That is almost always the service, the address, a convenient time, a name and a phone number.
In Easy Post the form works in two places. A client can answer the questions in a chat with a bot in Telegram, or open the same form in a browser from a link or a QR code, with no sign-up. From here on we call that browser page the web form. Each request reaches you in Telegram as a message with every answer. The form has no payments and no calendar of free slots, and you cannot reply to the client from that message: you call them yourself. The only files it takes are photos, so no documents or PDFs, and photos do not come through to Telegram: you see them only on the Easy Post site.
Payments, a calendar of free slots, document uploads and email alerts are not part of the form today; they can be built as an add-on or as custom work on top of it: describe what you need on the support page. Google Forms vs Easy Post compares this form with a Google Form.
Where to start
- Sign in to easy-post.app with Google. On the first screen, "What do you want to receive?", press "Bookings and service requests" in the "From customers" block. Easy Post builds the pipeline from the "Service Request" template at once and opens its page. A pipeline is your form together with its list of requests, and everything below starts from this page. At the top is the yellow "Still to do" panel, and under it the "Where people send submissions" block.
- In the yellow panel, press "Test the form in Telegram". Telegram opens with the Easy Post bot: press Start at the bottom of the chat. The bot replies that your Telegram is linked and that new submissions to "Service Request" will arrive in this chat. Then it sends the greeting "Welcome! Press the button to submit your entry." with a "Start" button. Press it, and the bot asks the first question. Answer as a client would; the questions are still the template's. The "No photo" button skips the photo question.
- A message with your answers arrives in the same chat, which means everything works. From here on we call that message a card. The pipeline page refreshes on its own and says "The form works: your test submission came through." If your computer has no Telegram, do this step from the pipeline page on your phone.
Besides the card, three more messages arrive in the chat, and none of them needs anything from you. The first is the reply you get as a client: "Thank you! Your submission is awaiting review." with a "Submit another" button. That is the default "Completion Text", and you will replace it below. The second starts "This is how every submission will reach you" and has a "Send the form" button. That button shares a link to the bot, while your clients will get the web form link, so leave it alone. The third asks whether to publish the pipeline's submissions in a channel and puts a "Choose a channel" button at the bottom of the chat. A channel is a feed for subscribers, and a service request form does not need one. The button stays at the bottom of the chat, but it does not block anything. Skip the "Add a channel if you want to publish" item in the yellow panel too; it is marked "Optional".
Go back to the pipeline page. It has a row of buttons at the top. "Form" opens the form settings: questions and texts. "Submissions" is the list of every request, and "Edit" changes the pipeline's name.
If you already have an account, you can pick the "Service Request" template with the "+ New pipeline" button on the project page, where your pipelines are listed. How many pipelines you can have depends on your plan.
What to ask: a service request form for repairs, lessons, delivery and beauty
The "Service Request" template in Easy Post has seven questions: the service (buttons), a description of the job, the address, a convenient time (buttons), photos, a name and a phone number. It is written for a technician who visits the client, so for other services you rewrite or remove some of the questions.
Press "Form" at the top of the pipeline page to open the form settings. Each question there is a separate frame with two boxes that are easy to mix up. "Bot prompt" is the question itself: clients see it in the bot and on the web form. "Field name, shown only to you" is the short label of the answer in your card, and clients never see it. The frame also has a "Type" menu and a "Required" checkbox, and a "Buttons" question has a box under it with the button names separated by commas. The cross in the corner of the frame deletes the question, and the arrows on the left move it up and down.
To replace the buttons, erase everything in that box and type your own. Keep commas out of the names: a comma separates buttons, so "Up to 1,500 sq ft" turns into two. Keep each button name under 55 characters. Length does not matter on the web form, but in the bot a name that is too long breaks the question.
The "+ Add Field" button under the questions adds a question of your own. It appears last, with the type "Text" and without the "Required" tick. Fill in both of its boxes, "Bot prompt" and "Field name…": with an empty name, the settings will not save. Change the type and tick "Required" if you need to, then move the question to its place with the arrow.
In all four sets below, keep the name and phone questions and check that both are ticked "Required". A request from the web form arrives without a name or a Telegram account: the only name in it is the one the client typed, and the phone number is your only way to reply. The "Phone" type accepts only digits, spaces and the characters + - ( ). If your clients write to you by email, change the type to "Text" and the question to "Phone or email:".
If you keep the photo question, rewrite it. The template says "Send a photo if it helps (up to {max_files}):", and the web form shows the client the curly braces as they are. Write "(up to 3)": the template takes no more than three photos, and the settings do not let you change that number. Also, the template accepts an answer to "Briefly describe the task:" only if it is at least 5 characters long, even after you rewrite the question.
To save, press "Save" under the "Submission Settings" section. Below the questions, the form settings have "Bot Messages" (the texts a client sees before and after the questions, covered below), and further down "Submission Settings" with the "Daily Limit" and "Monthly Limit" boxes. That button saves both the questions and the texts. Do not confuse it with the button in the block with the list of sites at the very bottom: that one saves only the list, and your question edits are lost. If you leave the settings without saving, your edits are lost too.
Repairs and home visits
Appliance repair, plumbers, electricians, cleaning. The template is written for this work, but its address and time questions are too general: "Address or area:" accepts "downtown", and "Today" does not say morning or evening. Fix both, or you will be asking on the phone.
- Rewrite "Which service do you need?" as "What needs fixing?", and type your own buttons in the button box, for example "Washing machine, Fridge, Dishwasher, Other".
- Rewrite "Briefly describe the task:" as "What happened? Brand, model, error code on the display:".
- Rewrite "Address or area:" as "Street, building, entrance, floor, flat:".
- "When is convenient for you?": type time windows as buttons, for example "Today before 2 pm, Today after 2 pm, Tomorrow before 2 pm, Tomorrow after 2 pm". If you book days ahead, change the type to "Date": on the web form the client picks a day in a calendar, and in the bot they type it in words, which the bot does not check. Then ask for the time of day with a question of your own, type "Buttons", with the buttons "Before 2 pm, After 2 pm".
- Keep the photos, but in the question replace {max_files} with 3: a photo of the model plate or of the leak makes it easier to quote before the visit.
If you price the job before you go, see the quote request form. If repair requests come from tenants or office staff, the maintenance request form suits them better and shows how to add a question about urgency.
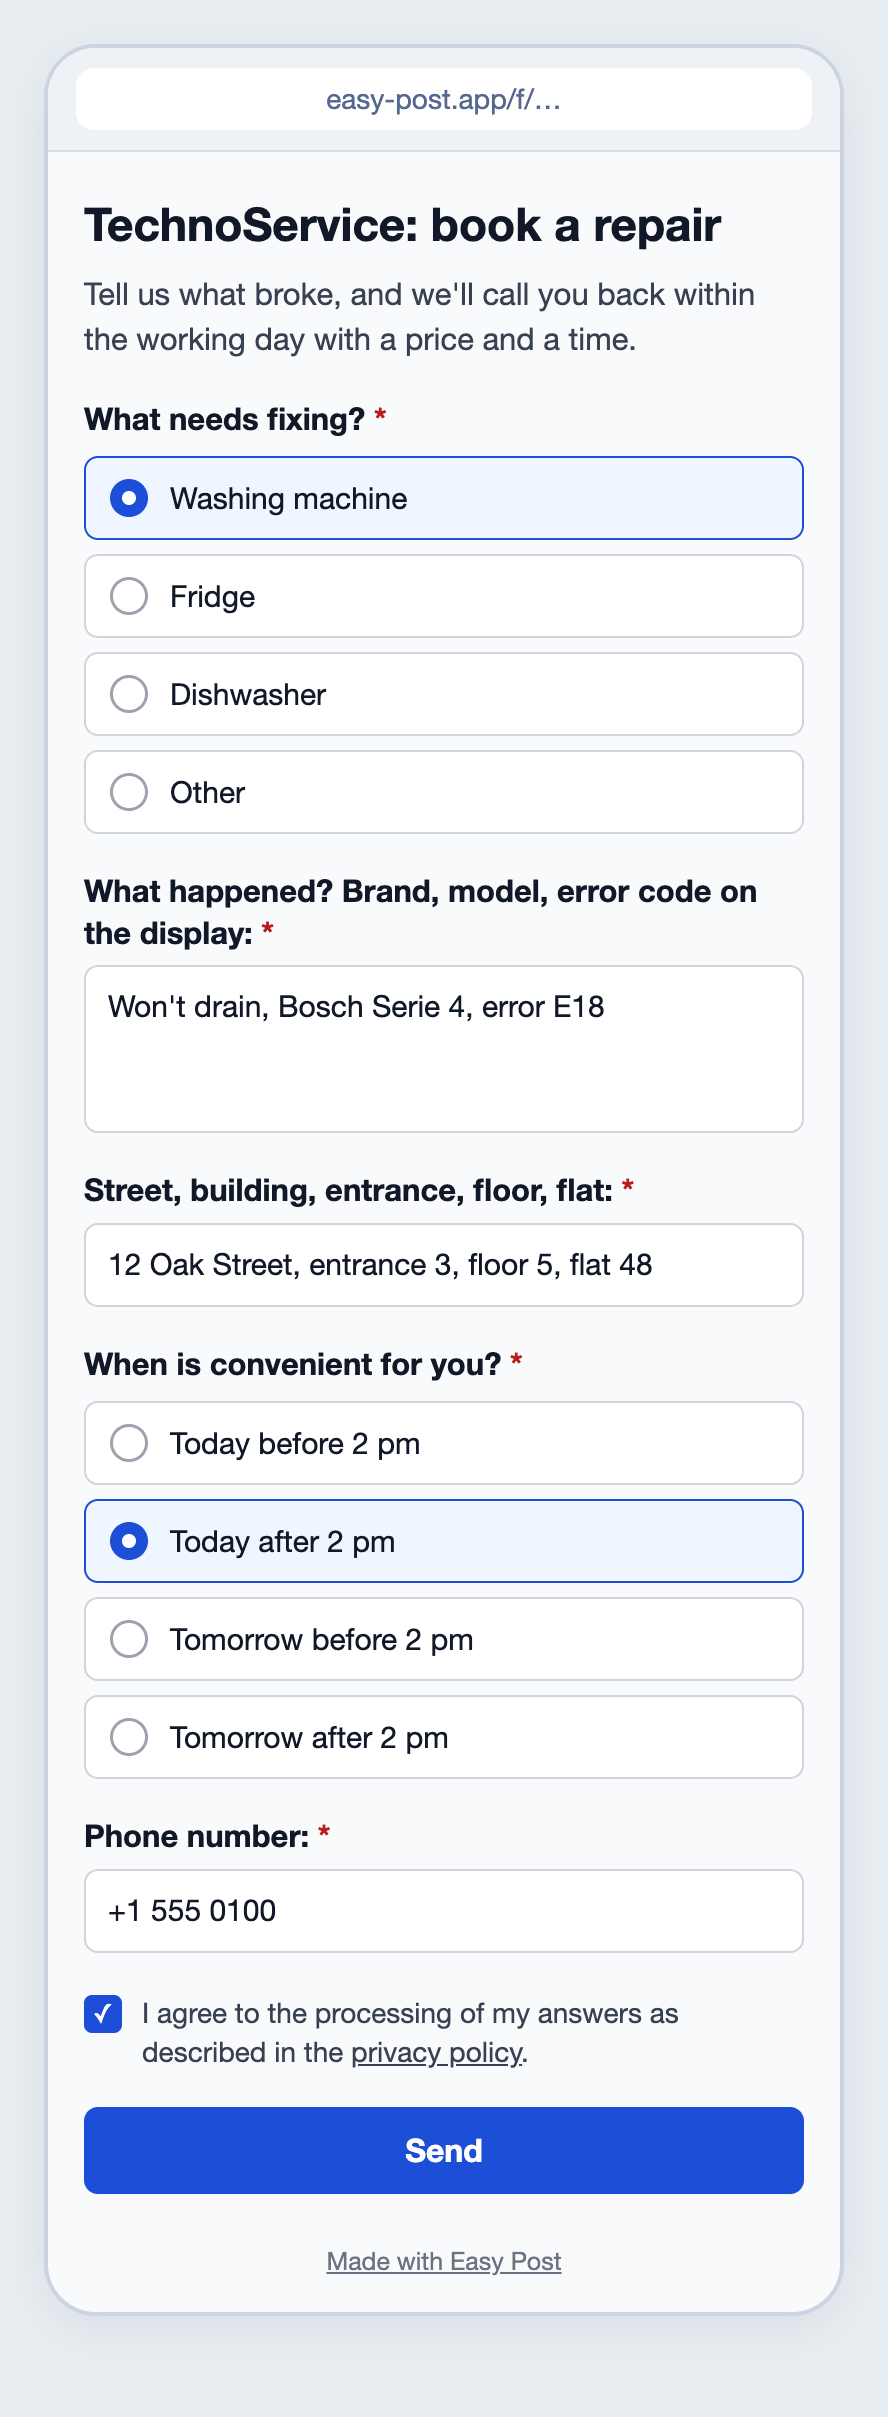
Illustration: the texts are the product's own, and the form owner writes the questions and buttons; the photo and name questions are not shown; the data is made up.
Lessons and tutoring
Tutors, courses, dance or music schools. You rarely need an address or photos here, and you ask about time in a different way.
- Rewrite "Which service do you need?" as "Which subject?", with the buttons "Maths, English, Exam prep, Other" and the field name "Subject".
- Rewrite "Briefly describe the task:" as "Your level and goal:", field name "Goal". An answer like "Grade 10, need help with algebra before exams" tells you which group or tutor fits.
- "Address or area:": if lessons are online or at your studio, change the type to "Buttons", the question to "Online or in person?", the buttons to "Online, In person" and the field name to "Format". If you go to students' homes, keep the address.
- "When is convenient for you?": buttons "Morning, Afternoon, Evening, Weekend".
- Delete the photo question with the cross.
For children's groups, add your own question "How old is the student?", type "Number", field name "Age".
Delivery and moving
Couriers, van hire with a driver, house moves. Here you need a second address, and the time is often tied to a date.
- Rewrite "Which service do you need?" as "What are we moving?", with the buttons "Documents, Small parcel, Furniture, House move, Other" and the field name "Load".
- Rewrite "Address or area:" as "Pickup address? Street, building, floor:", field name "From".
- Add your own question: bot prompt "Delivery address? Street, building, floor:", field name "To", type "Text". Tick "Required" and move it up with the arrow so it sits under "From".
- Rewrite "Briefly describe the task:" as "Weight, size, floor, and is there a lift:".
- Keep "When is convenient for you?" if you deliver the same day. For moves, change the type to "Date" and the question to "Which date?".
Freight has its own walkthrough in the transport request form article. If you sell your own goods with delivery, such as cakes or flowers, start from a different template, "Order with Delivery": it already asks about quantity and payment.
Beauty
Nails, brows, barbers, skincare. The form does not show free slots: the client writes when suits them, and you call back with the nearest opening.
- "Which service do you need?": buttons "Manicure, Pedicure, Mani and pedi, Brows, Other".
- "When is convenient for you?": change the type to "Text" and the question to "Which day and time suit you?". The client writes "Friday after 6 pm", and you see whether you have that slot.
- Delete "Address or area:" if clients come to you. If you do home visits, keep it.
- "Briefly describe the task:": untick "Required" and rewrite it as "If you chose Other, tell us what you need:". Anyone who picked a service with a button skips it.
- Keep the photo question and rewrite it: "Send an example of the design if you have one (up to 3):".
See a booking bot for salons for how a salon can take bookings through a bot.
Try the service request template →
Write what the client reads before and after sending
Above the questions in the form settings is the "Form Name" box. The note under it says "Internal name to identify this form.", but on the web form this is the title the client sees. The template puts "Service Request" there: write your business name and what the form is for, for example "TechnoService: book a repair".
Below the questions, the "Bot Messages" section has four boxes, and you need two of them: "Welcome Text" and "Completion Text". Clients see both in the bot and on the web form. The "Welcome Text" sits under the title of the web form. The box already holds the default "Welcome! Press the button to submit your entry." It is written for the bot, which has a "Start" button, and the web form has no such button. Erase it and write your own, for example:
Tell us what broke, and we'll call you back within the working day with a price and a time.
Clients see the "Completion Text" after the last answer in the bot, and on the web form after pressing "Send". The box says "Thank you! Your submission is awaiting review.", but you are not reviewing anything; you are calling back. Say when and how you will get in touch, and put in your own hours:
Thanks, we have your request. We'll call the number you gave today before 8 pm, or tomorrow from 9 am if you sent it later. You don't need to wait for a reply in Telegram.
The last sentence is there because of the "Find out the result in Telegram" button. The web form always shows it under your text, and you cannot remove it. It gives the client nothing: if they press it, the bot promises to message them "when your submission is reviewed", but you do not review requests, you call back, so that message never comes. Press "Save" under the "Submission Settings" section.
Put the form link where your clients come from
Under the "Still to do" panel on the pipeline page is the "Where people send submissions" block. It has two parts, and your clients need "Web form": its link opens for anyone, with or without Telegram. A pipeline made on the first screen has it switched on already, marked "On · taking submissions". If you made the pipeline with "+ New pipeline", turn it on with the switch, which saves the moment you flip it. The part shows "Link to the form", the "Copy link" and "Open the form" buttons, and under them the collapsed "QR code" and "Code for your site".
Take the link for clients from here, or from the "Copy the web form link" button in the yellow panel after your test. The other buttons nearby give a link to the Easy Post bot: "Copy link" in the "Telegram bot" part and in the yellow panel, "Send in Telegram" in the panel, and "Send the form" in the bot itself. Only people with Telegram can send a request through the bot, and the bot is shared: the client sees the name Easy Post, not yours. A bot of your own with your name is not in every plan; see the pricing page.
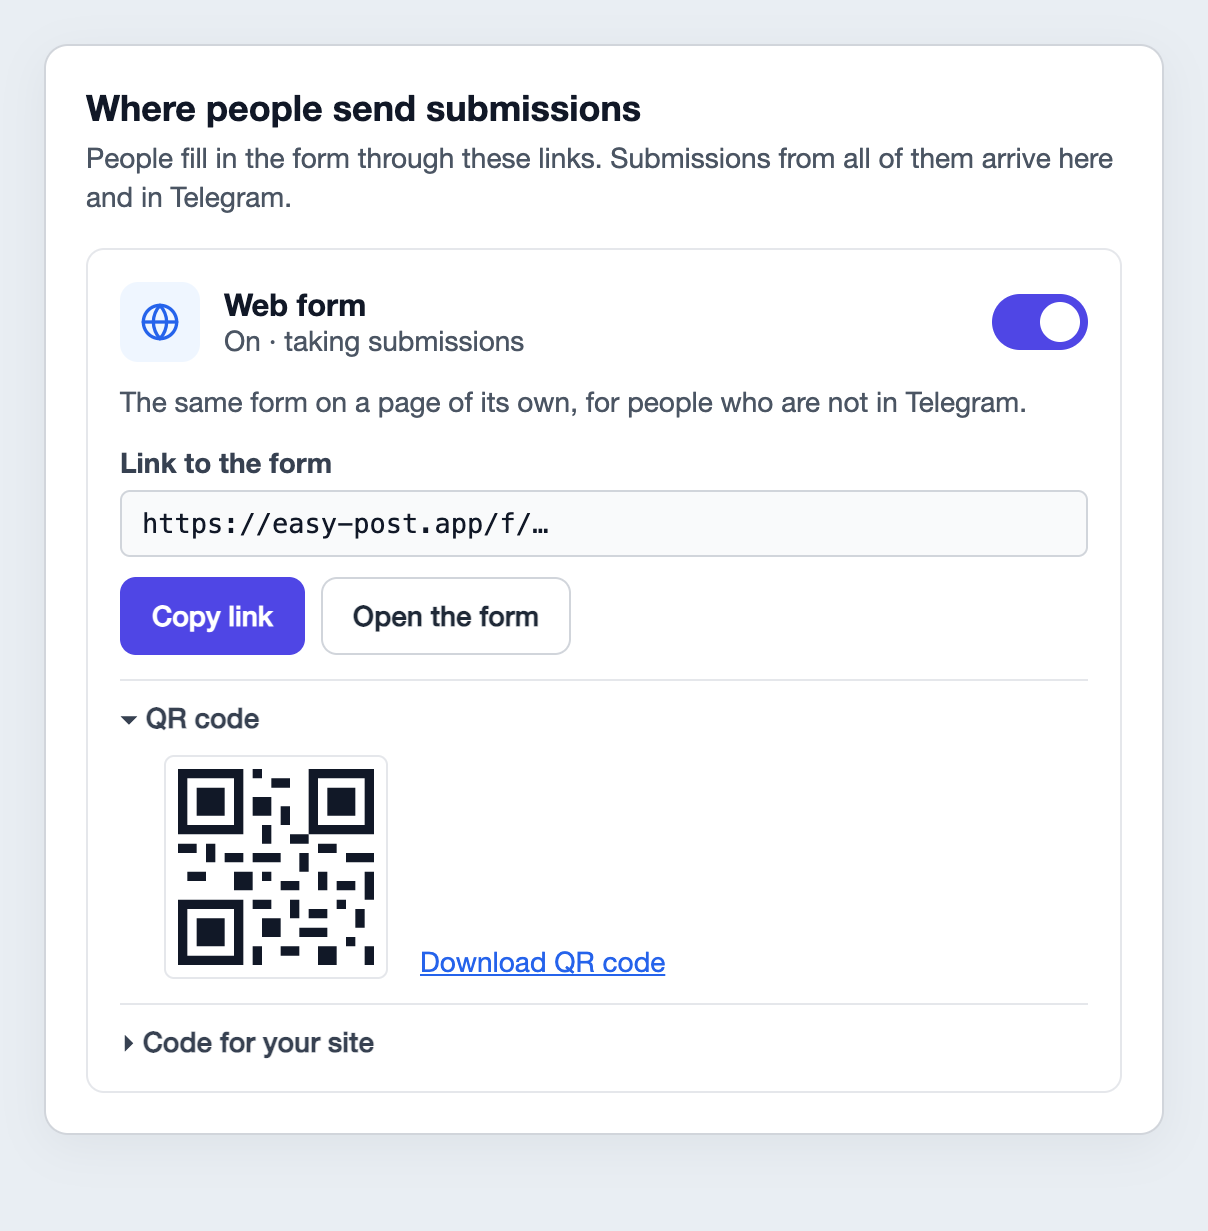
Illustration: the texts are the product's own; the link and QR code are placeholders, and the Telegram bot part is not shown.
In your profiles and chats
Put the web form link in your Instagram bio, in a Link sticker in your Stories and in your WhatsApp Business profile. In a conversation, just send it to the client in WhatsApp, Telegram or a text message when they ask "how much?" or "when can you come?": the link opens in the phone's browser. In WhatsApp Business it is handy to save it as a quick reply.
A QR code on business cards, flyers and appliances
Open "QR code" and press "Download QR code": you get an SVG file that stays sharp at any print size. Put the code where clients will think of you: on a business card and a flyer, on a sticker on the washing machine after a repair, on a sign by the barber's chair. You can stick it onto business cards you have already printed. If your print shop cannot open SVG, take a screenshot of the code on the page.
On your website
Open "Code for your site" and press "Copy code": paste these two lines on your contact page, in a block for HTML code. If your site builder does not accept the code, add a button that links to the web form. No website? Skip this step.
In ads
You can use the web form link as the address your ad leads to. The form does not record where a request came from, so to see which ad works, add a question of your own: bot prompt "How did you hear about us?", field name "Source", type "Buttons", buttons "Instagram, Ads, Friends, Other". Do not make it required, and keep it last.
Build your service request form →
Take requests in Telegram and call back
Each request reaches you in Telegram as a card from the Easy Post bot. At the top is "New submission in" followed by the name of the pipeline. The pipeline is named after the template, so at first you get "New submission in Service Request". Rename it: the "Edit" button at the top of the pipeline page, the "Pipeline Name" field, for example "TechnoService", and the "Update Pipeline" button. After that, the project page opens with its list of pipelines; to get back, press the name of the pipeline.
Below that comes the line "Saved in your dashboard" (the request is kept in "Submissions") and the answers with your labels. At the bottom is "🌐 Sent through the web form", or, if the client filled in the form in the bot, "From:" and their Telegram name.
Do not mix up these three names:
- "Pipeline Name" (the "Edit" button on the pipeline page) is the title of the card, and you see it;
- "Form Name" (above the questions in the form settings) is the title of the web form, and the client sees it;
- "Field name" (in the frame of each question) is the label of the answer in the card, and the client never sees it.
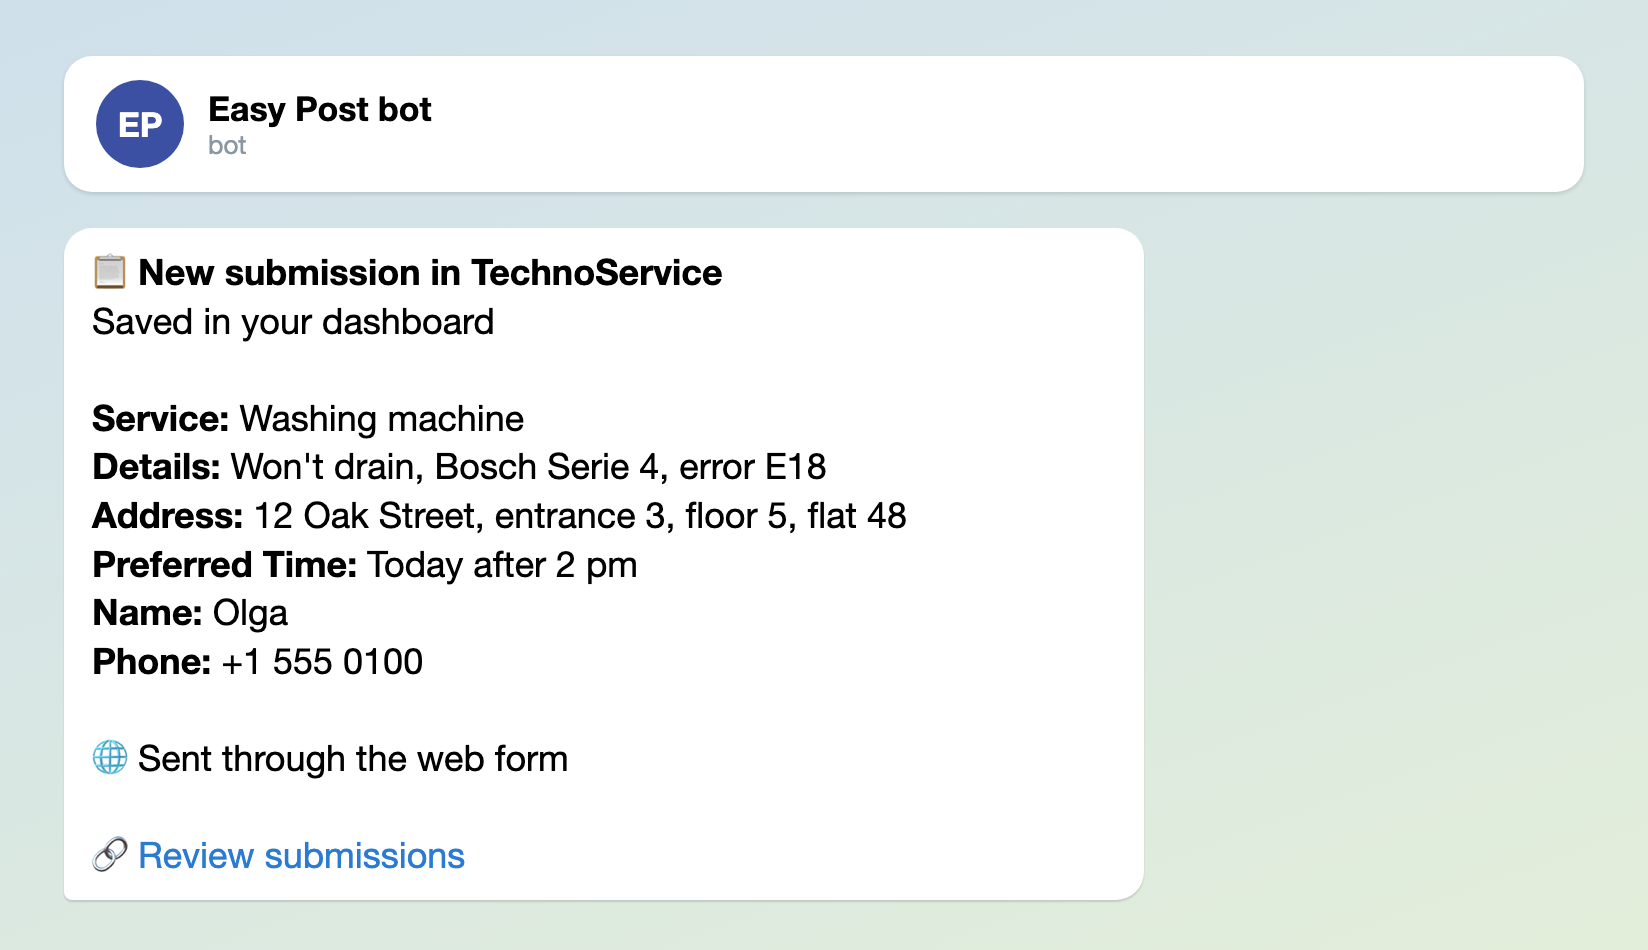
Illustration: the texts are the bot's own, and the form owner writes the field labels; names and data are made up.
The card has no buttons: you call the number in the request and give the price and the time. It leaves out two things: each answer is cut to 300 characters, and photos do not come through at all. The full text and the photos are in "Submissions", and the "Review submissions" link at the bottom of the card leads there. That list labels answers with internal field names (service, details, phone); your labels appear only in the card.
If an assistant needs to see requests, have them sign in to easy-post.app with Google first. Then add them by that email with the "Members" button on the project page (the project name at the top of the pipeline page leads there). Easy Post does not email them about it, so tell them yourself to link their Telegram with the "Link Telegram Account" button on the pipeline page. Cards go to each person's own chat with the bot, not to a shared group. Keep in mind that a member can change the form and delete requests.
Where it breaks
- Cards do not arrive. Check whether your Telegram is linked: if the pipeline page shows a "Link Telegram Account" button, press it. Your requests are still kept in "Submissions".
- The "Still to do" panel closed after a test request from the web form. Nothing is broken: the web form counts such a request as a client's. The link and the QR code stay in the "Where people send submissions" block. That is why you link Telegram through the bot first and test the web form after.
- A regular client cannot send a request in the bot. In the bot, the template takes 5 requests a day and 30 a month from one person, counting ones abandoned halfway. If, say, a property manager with a dozen flats writes to you, raise the "Daily Limit" and "Monthly Limit" (form settings, "Submission Settings" section) and press "Save" under that section. The web form has no such limits.
- The web form says "Made with Easy Post" at the bottom. The note appears on some plans; the "Web form" part of the pipeline page says which plan removes it.
- You need a spreadsheet of all requests. "Submissions" has no export. A webhook, which sends each request to another service automatically, can forward requests to a spreadsheet or a CRM; it is not in every plan. The quote request form article shows how to set it up.
Setup in five steps
- Sign in with Google, pick "Bookings and service requests" on the first screen, press "Test the form in Telegram", press Start in the chat and "Start" under the greeting, and answer as a client. Do not press "Send the form" or "Choose a channel".
- Press "Form": rewrite the questions for your set, check that the name and phone are ticked "Required", and change the "Form Name". In the photo question, replace {max_files} with 3.
- In the same settings, replace the "Welcome Text" and the "Completion Text", and press "Save" under "Submission Settings". Rename the pipeline with the "Edit" button.
- Check that the web form is on, press "Open the form", send a test request and check the card. Delete test requests in "Submissions" with the "Delete" button next to each one.
- Put the link from the "Web form" part in your profiles and send it to clients; put the QR code on business cards and stickers.
Other forms for similar jobs: lead form, quote request form and maintenance request form. All forms are listed by job in the guide to forms in Telegram.
New to bots? How to create a Telegram bot without code covers the basics, although this setup does not need a bot of your own.