The office printer stops working. One colleague mentions it in the kitchen, another writes "wifi is down again" in the staff chat, a third forwards an email with a photo of an error message taken at an angle. Whoever handles IT next to their actual job starts every request with the same questions: which computer, what does the message say, how urgent is it? A week later nobody can say who reported what, or from which computer.
An IT request form in a Telegram bot asks everyone the same questions and sends the answers to your Telegram as one message, the "card", with the sender's name on it. Each request is a "ticket", and "you" is whoever receives the tickets. Your colleagues need only Telegram, not an Easy Post account. Easy Post is the website where you build the form.
The form only takes requests in. It does not assign a ticket to a person, track whether it is open or done, count response times, or tell your colleague when the problem is fixed. If several people work one queue, or you must show response times, you need a helpdesk, a program built for queues, statuses and timers. If your trouble is that requests arrive incomplete and scattered, the form fixes that part.
Where to start
You set everything up on the easy-post.app website. Sign up, and the first screen asks you to pick a template: pick "IT Support Ticket". Easy Post then builds a "pipeline", which is your form together with the list of tickets it collects. We call that list the "dashboard"; the Submissions button on the pipeline page opens it (Easy Post calls each ticket a "submission").
The bot your colleagues talk to is Easy Post's own, so you do not create one. Each ticket arrives in your Telegram as a message, so on the pipeline page press "Test the form in Telegram" to link your account. You need no Telegram channel (a feed that publishes posts to readers), so leave the channel box in the "Still to do" block of the pipeline page empty. After your first test the bot may offer to publish to a channel; ignore it.
Already have an account? Press "+ New pipeline" on your project page and pick the template there, if your plan has room for another pipeline.
The IT request form: five questions, and one to add
This is the IT Support Ticket template in Easy Post. Open Form Settings (the Form button on the pipeline page). Every question is a row in the list. Each row has a "Field name, shown only to you" box (the label on your card), a "Bot prompt" box (the question your colleague sees), a Type menu, a "Required" tickbox and a × that deletes the question. When you choose Buttons, a box for the button names appears under the prompt. All names go in that one box, separated by commas, so a name cannot contain a comma. The no-code form builder guide shows the editor in more detail.
- Category (required; prompt "Issue type:"; buttons Hardware, Software, Network, Access, Other). Rename the buttons to what really breaks in your office, for example Printer, Wi-Fi, Laptop, Access, Other. Keep Other, or the one odd request has nowhere to go.
- Priority (required; prompt "Priority:"; buttons Critical, High, Normal). A colleague can pick Critical for anything, and the word alone does not say what stopped working. Name the buttons by what the problem does to their work: "Cannot work", "Slows me down", "Can wait". The card then tells you the impact.
- Description (required; 10 to 1,000 characters; prompt "Describe the issue:"). Change the prompt to "What were you doing, and what happened? Copy the error message if there is one."
- Screenshot (optional; up to 3 photos; the skip button says "No screenshot"). Colleagues must send screenshots as photos from the gallery, not as files; a file gets "Please send a photo." They should send all screenshots first and then tap Done, because after the first photo a text message counts as the next answer.
- Reporter (required; prompt "Your name and department:"). Keep it. The card shows the sender's Telegram first name, which can be a nickname. This question adds who they are and where they sit.
- Device (add this one yourself; optional text, prompt "Which computer or device? The name on the sticker, or 'my phone'"). The template does not ask for it, and without it you have to ask which computer the ticket is about. Add it with "+ Add Field": type a name in the name box and fill in "Bot prompt", or the form will not save. The new field is optional and goes last, which suits this one. Then press Save at the bottom of the page.
The one setting for tickets with screenshots
Easy Post also builds a text from the Post Template, a box lower down in Form Settings. It is meant for channel posts, which you do not use, but when a ticket has a screenshot the bot still checks that this text is no longer than 1,024 characters. The default Post Template contains every text answer with its label, and Description allows 1,000 characters, so a description of about 900 characters or more with a screenshot, such as a pasted block of error messages, goes over the limit. The bot then deletes the ticket and tells your colleague to shorten the text and start again. Everything they typed is gone, and you get no message.
In Form Settings find the "Post Template" box, delete its text and type <strong>{category}</strong>: {priority} in its place. Type it exactly as shown; the braces are placeholders for the answers. You do not publish to a channel, so nothing is lost: the Telegram card and the dashboard do not read this box, and they still show the answers. Press Save at the bottom of the page. The bug report form uses the same fix.
What happens when someone files a ticket
- You share one link where your colleagues already talk: the staff chat, the intranet page, a note by the printer. The "Where people send submissions" block on the pipeline page has a "Copy link" button.
- Right after the last answer the colleague sees your confirmation (text below). At the same moment the ticket reaches you in Telegram, together with everyone on your project who has linked Telegram. The card has the answers, the sender's Telegram first name (with @username, if they have one) and a "Review submissions" link to the dashboard. It has no Approve or Reject buttons, because nothing here needs your decision.
- The card cuts every answer at 300 characters and does not show the screenshot. The full text and the photos are in the dashboard, which prints each answer under the question's short internal name (category, priority, description).
- To answer, write to the @username on the card; a sender without one shows as a first name only, so look for that name in Telegram. Your colleague cannot reply in the bot chat.
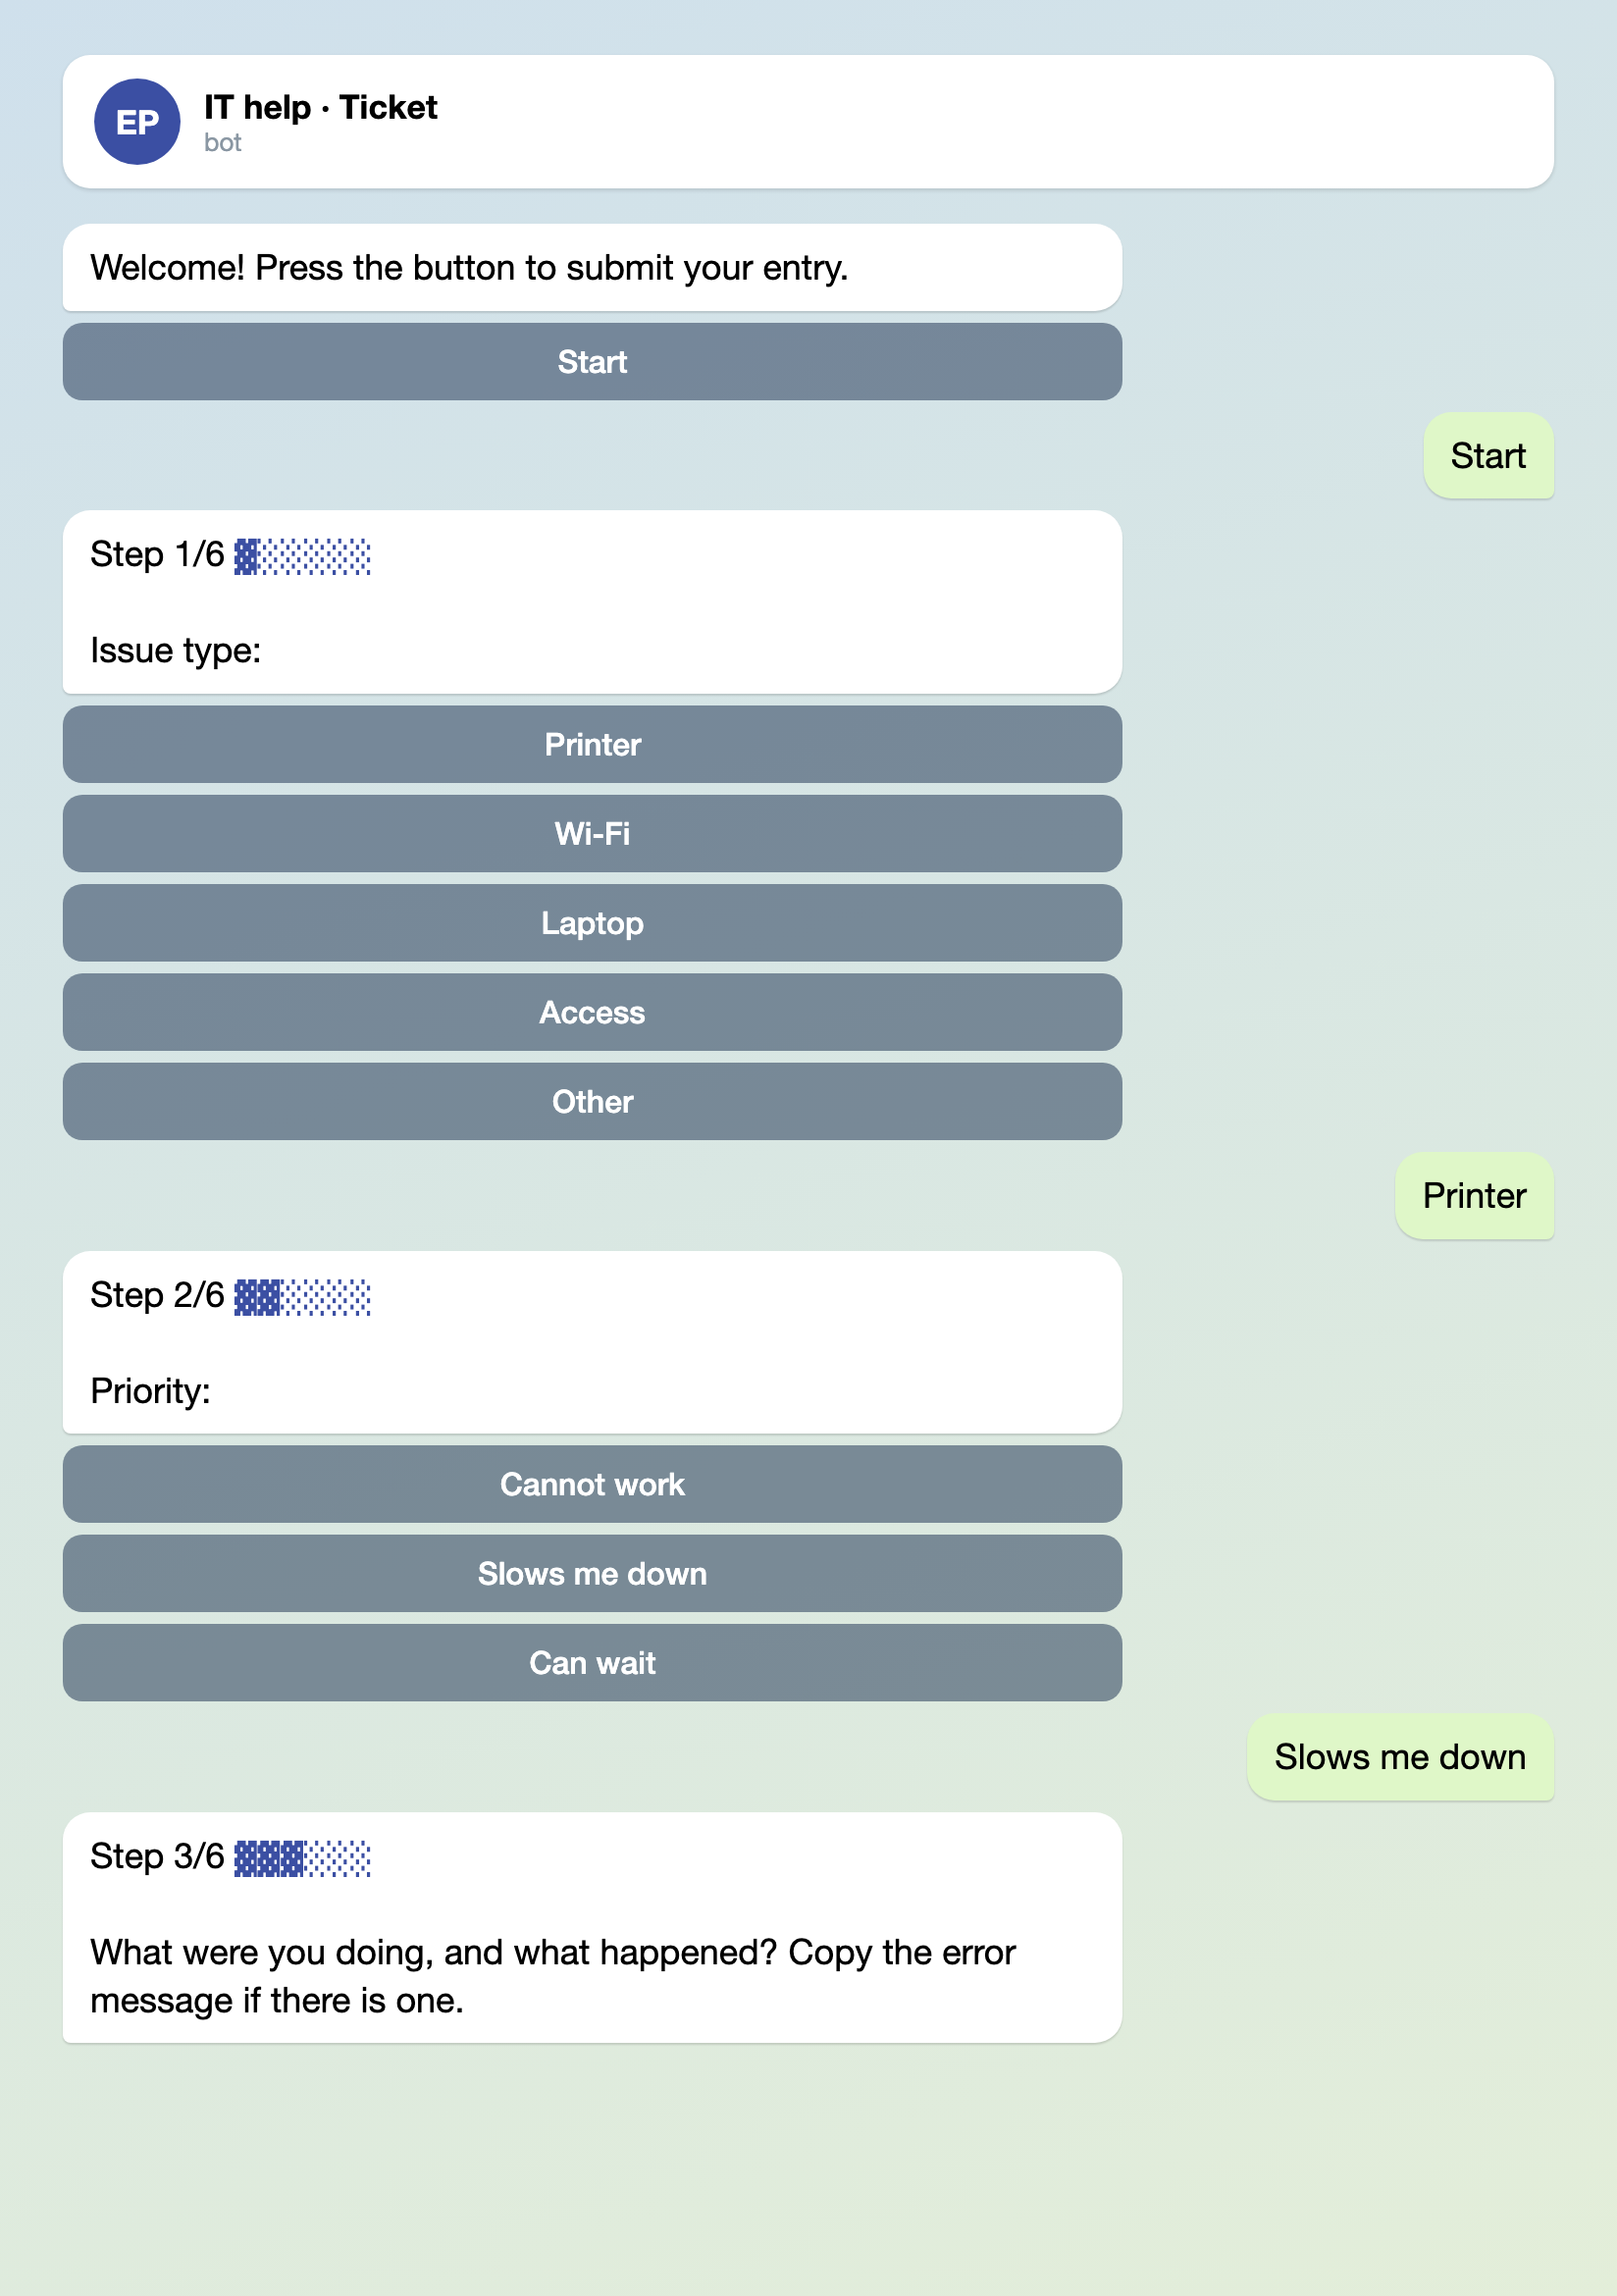
Illustration: the system texts are the bot's own, while the questions and buttons are the ones you write; names and data are made up.
Because nothing here waits for a decision, Easy Post marks every ticket Approved. The dashboard opens on the All tab, where every ticket is listed, newest first, 20 to a page, with no search and no filter by priority.
There is no "done" status. You can use Delete as one: keep the open tickets in the list and delete the finished ones; tick the boxes beside tickets to delete several at once. A deleted ticket moves to the Deleted tab, and the sender is not notified. If you want a status column, a webhook (a web address that receives each ticket and passes it on, for example into a Google Sheet) can send every ticket to a sheet, as the inventory sheet article does for stock records. Webhooks are not included in every plan.

Illustration: the card layout is the bot's own, and the field names are the ones you set; names and data are made up.
To give a second person the cards, add them to the project. They need an Easy Post account first. On the project page press Members, enter their email and press Invite. They link Telegram on their profile, or with the "Link Telegram" or "Test the form in Telegram" button on the pipeline page. A member sees every ticket and can also change the form, add or remove webhooks and delete tickets, and only you manage members, so invite only people you trust.
The confirmation text and the limits
In Form Settings, under "Bot Messages", find the "Completion Text" box: it holds what the bot sends your colleague after the last answer. The default is "Thank you! Your submission is awaiting review." Nobody reviews anything in this setup, so replace it.
Ticket received. IT reads tickets on weekdays from 9 to 6 and answers in Telegram. If nobody in the office can work, call 555 0100.
Replace the hours and the phone number with your own. Put in the hours IT really reads tickets, and for an outage that stops everyone give a phone number. Under the confirmation the bot shows a "Submit another" button.
Each colleague can start 10 tickets a day and 50 a month; unfinished and deleted tickets count too. At the limit the colleague sees "Daily limit of 10 submissions reached. Try again tomorrow!" and you are not told. Raise "Daily Limit" and "Monthly Limit" under "Submission Limits" in Form Settings, then press Save.

Illustration: the system texts are the bot's own, while the confirmation is the one you write; names and data are made up.
Three things to check before you share the link
- The form cannot tell who is typing. The Telegram name is whatever the person put in their profile, and Easy Post does not check that the sender works for you. Share the link only where your colleagues are. Treat a ticket in the Access category (a password reset, a new account, a permission) as a request, not proof: confirm the person by a call or through their manager before you act, and tell colleagues never to type a password into the form.
- A screenshot is stored on Easy Post's server at an address that opens without signing in, and a webhook carries the same address. If your office handles client data, ask colleagues to crop out passwords and other people's data, or to describe the problem in words.
- A critical ticket arrives as an ordinary Telegram message, like any other. To make sure someone else sees it, add a second person in Members. To send only the top priority somewhere else, such as a group chat or a phone alert, use a webhook with a condition, a rule that lets only matching tickets through: Priority equals "Cannot work". The webhook needs a web address, which comes from a tool such as Make or Zapier that posts to your chat or sends the alert. The quote request form article walks through the Actions screen step by step. Tick Auto-approve there: without the tick every ticket waits for your Approve and your colleague gets "Your submission has been approved!". With the tick the card heading reads "Auto-approved submission", and the card still reaches you for every ticket. If you rename the button later, edit the condition too. Webhooks are not included in every plan.
What the form does not do
Beyond the missing statuses and timers, the form takes photos only, so logs and documents do not fit: ask colleagues to paste the error text into the description, or write to support if you need files. When you outgrow the form, move to a helpdesk. The dashboard has no export, so the tickets you collected stay there to read, not to copy out.
Set it up in five steps
- Pick "IT Support Ticket" in the template list, then press "Test the form in Telegram" to link your Telegram.
- In Form Settings rename the Category and Priority buttons, change the Description prompt, add Device, replace the Post Template and press Save.
- Replace the Completion Text, check the Submission Limits and press Save.
- Send a test ticket with a screenshot yourself, from the link under "Where people send submissions" ("Open bot" or "Copy link"), and check the card in Telegram.
- Post the link where your colleagues will find it. Add your second IT person in Members.
Only getting started with bots? Read how to create a Telegram bot without code. For repairs and facilities requests there is a similar maintenance request form.