A visitor fills in the contact form on your website. The request goes to an inbox you open in the evening, or to spam, or nowhere at all because the mail setup broke after an update. By the time you call back, they have booked someone else. A contact form that sends to Telegram puts the request on your phone as a message, next to the chats you answer all day anyway.
This guide sets that up with the web form in Easy Post. You paste two lines of code into your site, and every request arrives in your Telegram. You install no plugin and create no bot. Your visitors do not need Telegram either, so you answer them by the phone number or email they type, and the form has to ask for it in a way that works.
Before you start, know three limits. The form on your page will be the Easy Post form: your current contact form cannot send to Easy Post, so you replace it. The visitor gets no email copy of what they sent. And the form takes photos but no other files, and the photos stay on the Easy Post site instead of coming to Telegram. A way for your own form to send to Easy Post, an email copy for the visitor and files other than photos are not part of the form today; they can be built as an add-on or as custom work on top of it: describe what you need on the support page.
Where to start
You set everything up on the easy-post.app website. Sign in with Google. The first screen asks "What do you want to receive?": press "Bookings and service requests". Easy Post builds the form from the "Service Request" template at once and opens the pipeline page. A pipeline is your form together with the requests it collects, and everything in this guide starts from this page. At the top are the two buttons you will use most: "Form" opens the form settings, and "Submissions" opens the list of requests that came in. Below them is a yellow "Still to do" panel, and under it the "Where people send submissions" block.
Requests reach you as Telegram messages, so link your Telegram first. In "Still to do", press "Test the form in Telegram". Telegram opens with the Easy Post bot: press Start. The bot replies that your Telegram is linked, then sends the form's welcome message with a Start button (on some plans with a "Powered by Easy Post" line). Press that button, and the first question arrives. Answer the questions as a customer would, and the test request arrives in the same chat as a message; the pipeline page then says the form works. You can delete this test later under "Submissions". If Telegram is only on your phone, open the pipeline page on your phone for this step. After the test, the bot first answers you as it would a customer, with the Completion Text and a "Submit another" button. Then it sends a "Send the form" button, which shares the bot link, not the web form, so you do not need it here. It also asks whether to publish submissions in a channel (a Telegram feed for readers). A contact form does not need one, so ignore that question and skip the "Add a channel if you want to publish" item in "Still to do", which is marked Optional.
Turn the Service Request template into a contact form
The Service Request template in Easy Post asks seven questions for an on-site job. A contact form usually needs fewer. Press "Form" on the pipeline page. Each question there is a card with a box called "Field name, shown only to you" (the label in your Telegram message), a "Bot prompt" box (the question the visitor reads), a Type menu and a × in the corner that deletes the question. When the type is Buttons, a box for the button names sits under the prompt.
| Question in the template | What to do |
|---|---|
| Service: buttons "Service 1", "Service 2", "Service 3", "Other" | Keep it. Type your own services into the button box, separated by commas, so each request arrives already sorted. A service name cannot contain a comma. |
| Details: "Briefly describe the task:", 5 to 500 characters | Keep it. On the page it is a large text box. You cannot change its length limits. |
| Address: "Address or area:" | Keep it if you go to the customer. Delete it if you do not. |
| Preferred Time: buttons "As soon as possible", "Today", "Tomorrow", "This week" | Keep it if you book visits. Delete it if you do not. |
| Photos: up to three, optional | Photos never come to Telegram: they are only on the site, under "Submissions". Delete the question if you do not need photos. If you keep it, rewrite its Bot prompt in your own words, for example "Send a photo if it helps (up to 3):", because the template's wording shows a code in curly brackets on the web page. |
| Name: "Your name:" | Keep it. |
| Phone: "Phone number:", type Phone | Keep it if you only call back. If you also reply by email, change the type to Text and change both the Field name and the Bot prompt to "Phone or email". The Phone type accepts only digits, spaces and + - ( ), so it refuses an email address. |
When you are done, press Save under the questions: changes are lost if you leave the page without it. If tenants send you repair requests as their landlord or manager, the maintenance request form guide fits better, and agencies that collect a project brief can start from the client intake form guide.
Try the Service Request template →
Write the three texts your visitor reads
Three more boxes in Form Settings control what the page says, and the texts they start with were written for the bot.
- "Form Name", at the top of Form Settings, is the heading of the page. The hint next to it calls it an internal name, but the web form shows it to every visitor. It starts as "Service Request": change it to "Contact us" or to your business name.
- "Welcome Text", in the "Bot Messages" section further down, appears under the heading. The bot sends the same text when someone presses Start, so the box starts with a line about pressing a button, and the page has no such button. Write a text that fits both places, for example: Tell us what you need. We reply within one working day.
- "Completion Text", in the same section, appears after Send, under the word "Sent". Whatever it says now, replace it with when and how you will answer, for example: Thank you. We will call or email you within one working day.
Then press Save. The page has two Save buttons, one under the questions and one under "Submission Settings", and either of them saves the questions and the texts. Further down, the "Web form" box has a third "Save" that saves only its list of sites, not the questions or texts.
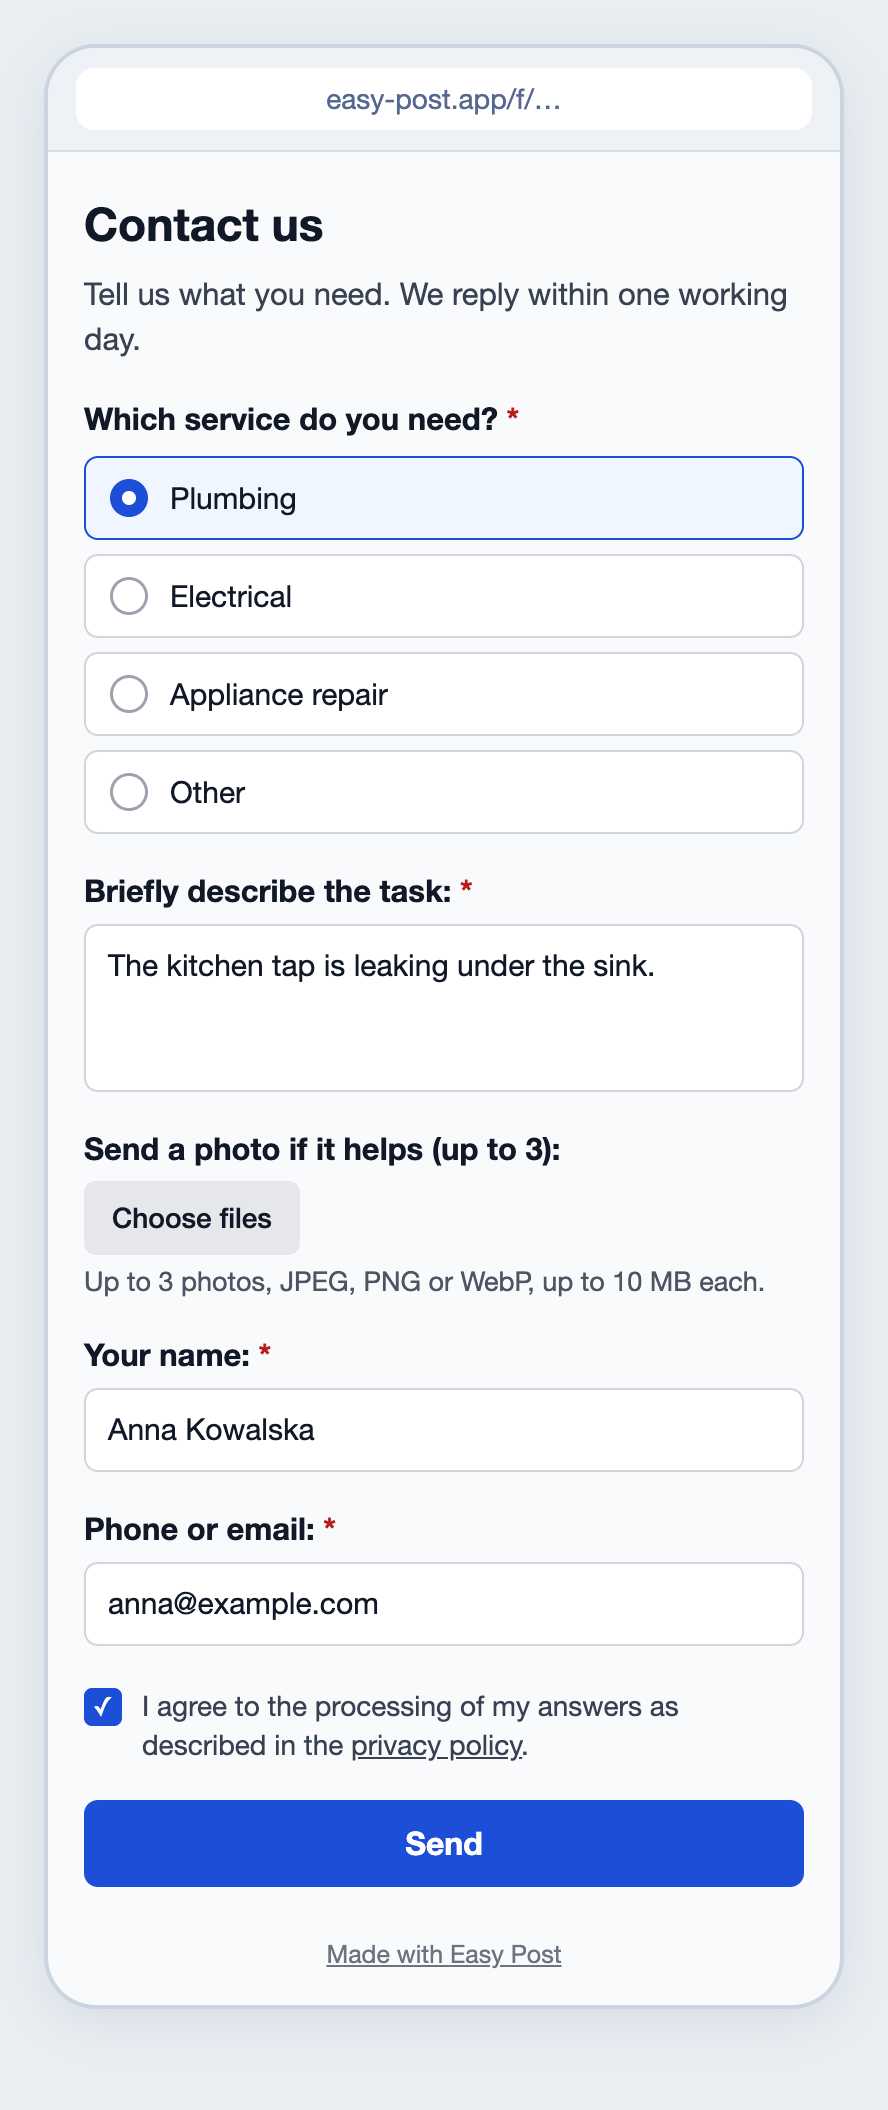
Illustration: the heading, the line under it and the questions are yours; the rest is Easy Post's own; names and data are made up.
Put the form on your site
On the pipeline page, find "Where people send submissions". The "Web form" card there should say "On · taking submissions": a pipeline made from the first screen starts with the form on. If it says "Switched off" (a pipeline made with "+ New pipeline"), press its switch; it saves at once. The card then shows "Link to the form", the "Copy link" and "Open the form" buttons, and two collapsed sections: "QR code" and "Code for your site".
Open "Code for your site" and press "Copy code". You get two lines: a frame that shows the form, and a small script that makes the frame as tall as the form, so it has no scrollbar of its own. Now open your contact page in your site's editor. Remove the old contact form, including any copy in the footer or on other pages, or some visitors will keep sending their requests to your email. Paste the two lines where it stood, into a block that accepts HTML code: in WordPress that is the Custom HTML block, and page builders such as Elementor have a similar HTML element. Press Save, Update or Publish (the name depends on your WordPress version and whether the page is already live), then open the page to check that the form shows.
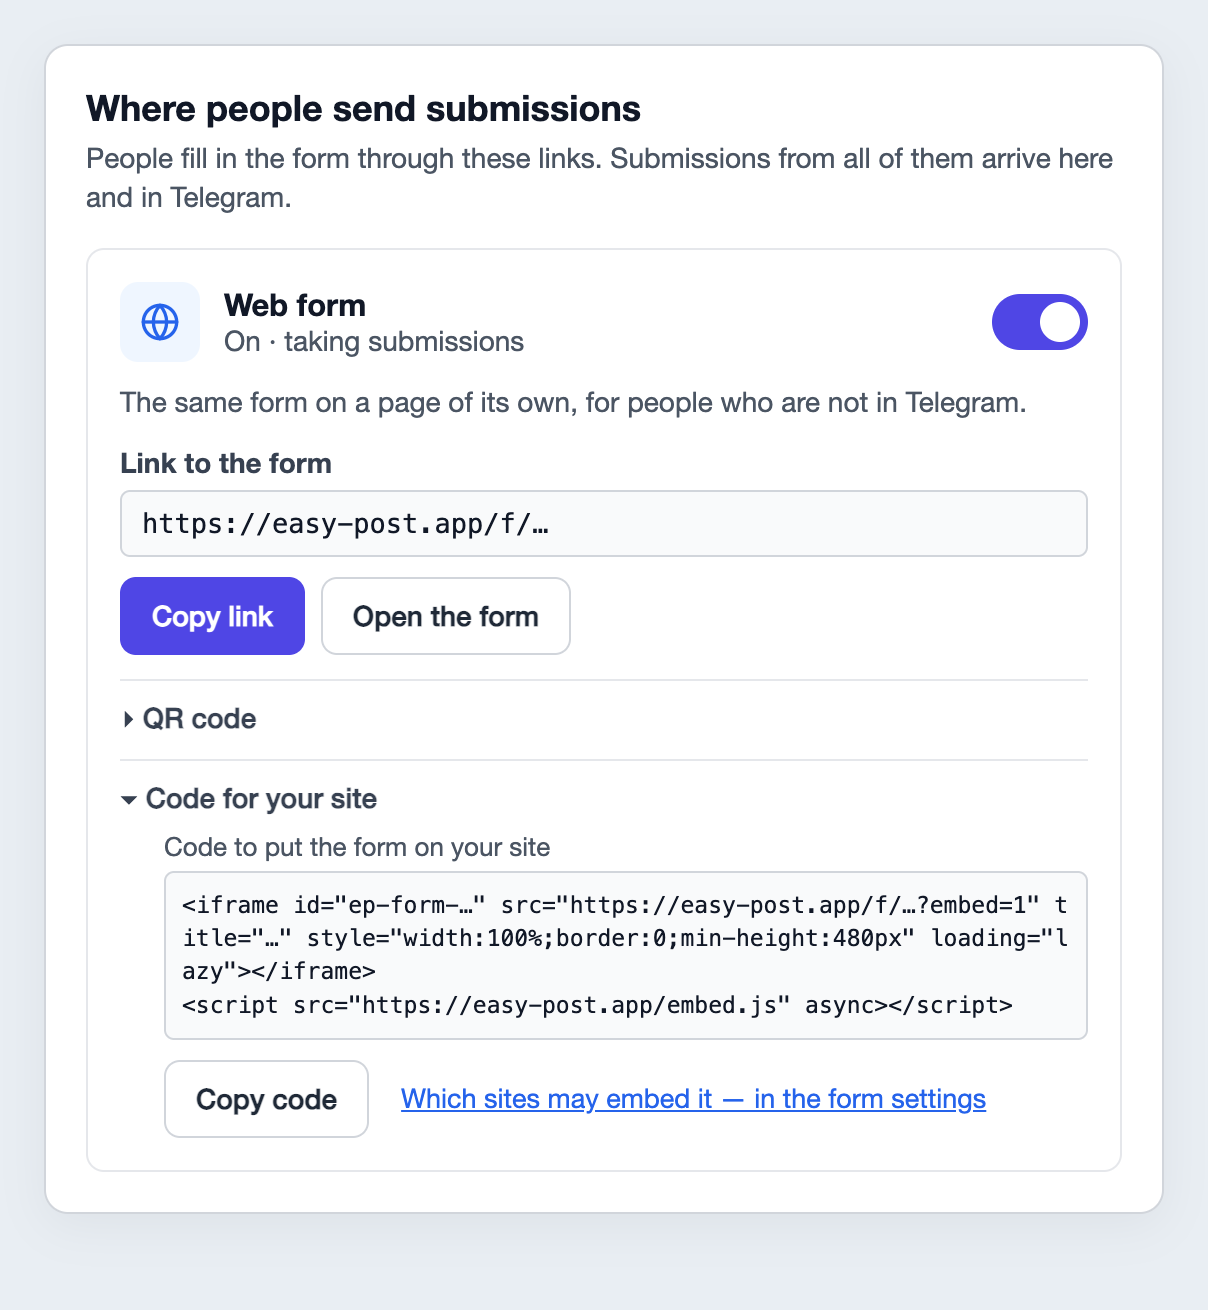
Illustration: the texts are Easy Post's own; the link is shortened.
If the form does not show, your site is probably refusing the code. If someone else built your site, ask them which of these cases is yours. On WordPress.com, code like this works only on paid plans that include hosting features. On any WordPress site, an account with the Contributor role cannot save it, so ask the site's administrator to paste it. In Tilda, the T123 block shows the code as plain text in the editor, and the form appears only on the published page. Some site builders remove the script part of the code; you do not need to do anything then, because the form still works, only with a fixed height and its own scrollbar. If your builder accepts no code at all, add a button or a link that opens the address from "Link to the form".
By default any site can show your form. You can limit that, so nobody else puts your form on their pages; this step is optional. Follow "Which sites may embed it — in the form settings" next to "Copy code". In "Sites where the form may be embedded", type your site address without the page path, each version on its own line, for example mysite.com and www.mysite.com: the version with www counts as a different site. Easy Post adds the https:// itself. Press Save and open your contact page again. If the form has disappeared from your own site, a version of the address is missing: add it, or clear the list to let every site show the form again. The link and the QR code keep working everywhere, so you can also put the link in an email signature or print the QR code on a flyer.
What reaches you when someone sends it
Each request arrives in your Telegram as one message from the Easy Post bot. It lists the answers under the labels from "Field name", shows "🌐 Sent through the web form" where a bot message would show the sender's name, and ends with a "Review submissions" link. The heading names the pipeline, which carries the template's name, "Service Request". To change it, press "Edit" on the pipeline page, type a new "Pipeline Name" and press "Update Pipeline". The line "Saved in your dashboard" means the request is also kept under "Submissions" on the site. The message has no Approve or Reject buttons, because nobody is waiting for a yes or no: you reply yourself, by the phone number or email in it.
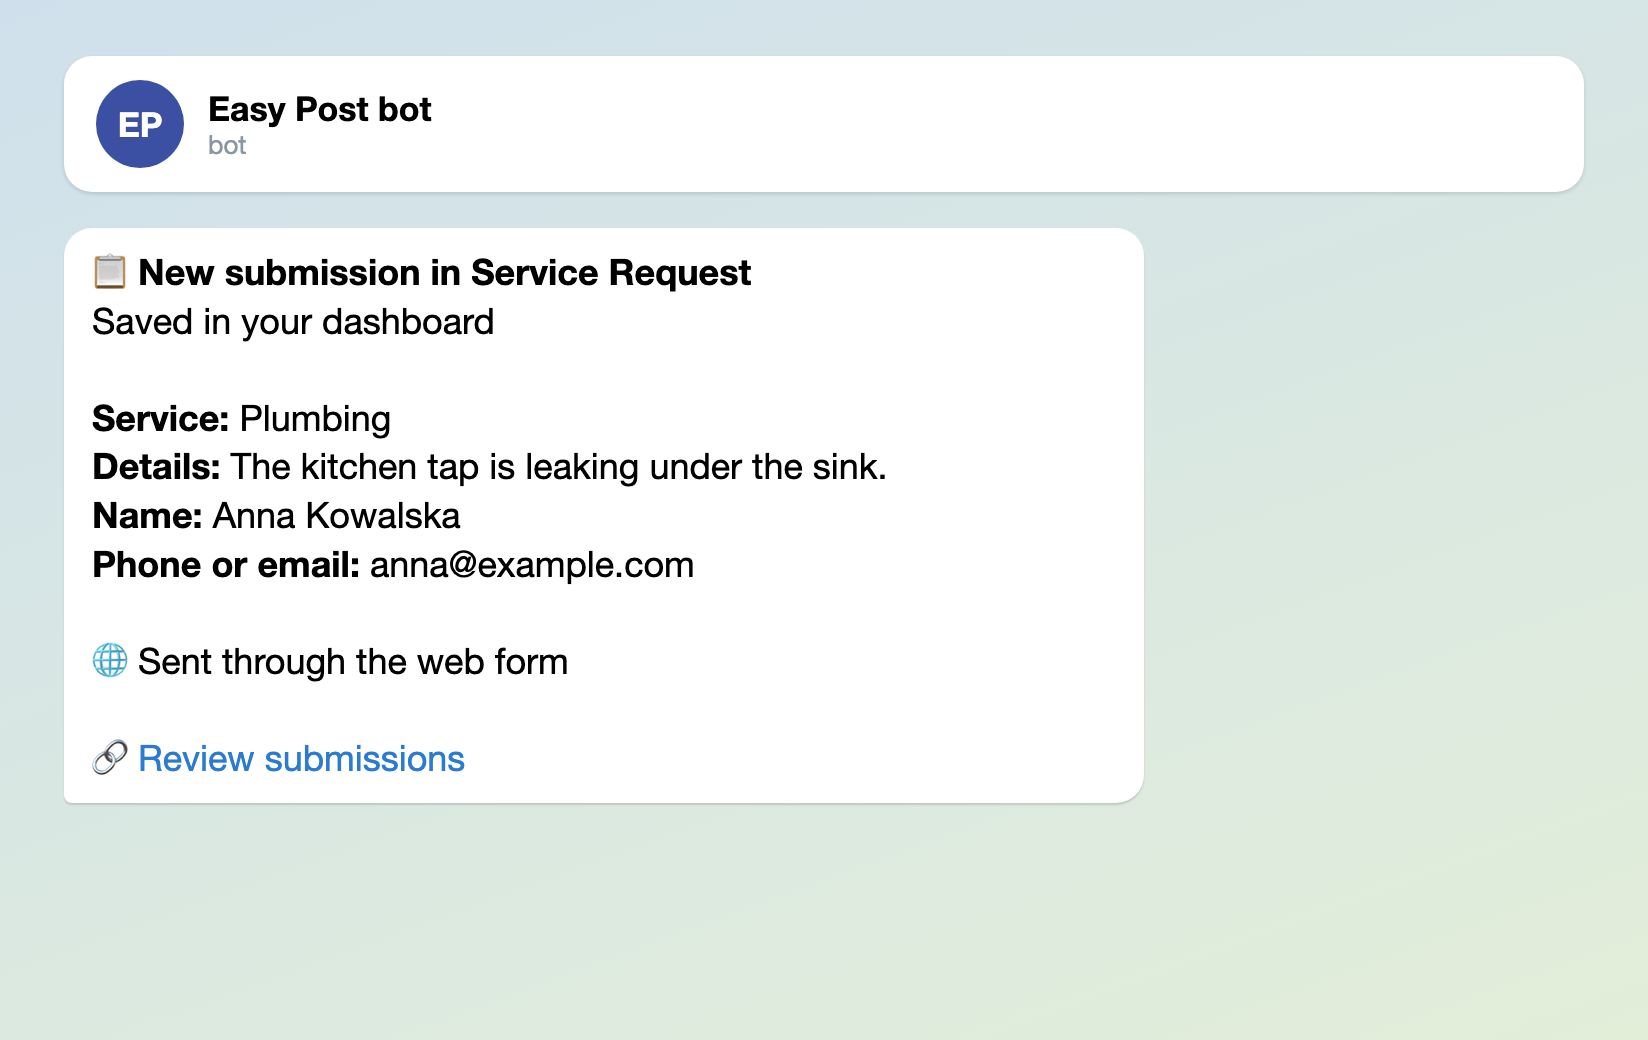
Illustration: the texts are the bot's own, and the field names are the ones you set; names and data are made up.
Two things are missing from the message. Photos stay under "Submissions", and the message does not say that one was sent, so if you kept the photo question, check "Submissions" from time to time. And each answer is cut at 300 characters, so a long description arrives shortened; the full text is under "Submissions" too.
The messages go to private chats, not to a group: each person gets them in their own chat with the bot. If your crew should see requests too, open your project page (the project name at the top of the pipeline page leads there) and press "Members", a button only you see. Each person needs their own Easy Post account and then links their Telegram with "Link Telegram Account", on the pipeline page or in "Profile". Any member can also change the form, so add only people you trust with it.
If you also want every request in a spreadsheet or a CRM, a webhook can send each one there. When you add it, tick Auto-approve, or every request starts waiting for your Approve. Webhooks are not included in every plan; the quote request form article shows one set up.
Formspree, Web3Forms, plugins or this form
Other tools also send a website form to Telegram. If you already use one of them, it may be enough:
- Your site is on Tilda. Tilda sends form requests to Telegram itself, through its @TildaFormsBot (Tilda help).
- Someone built your form by hand and you want to keep it. Formspree and Web3Forms accept such forms. Formspree lists a Telegram message for each submission on every plan, and its free plan takes 50 submissions a month (Formspree plans). Web3Forms calls Telegram a PRO feature (Web3Forms docs).
- Your WordPress form is made with Contact Form 7. The Message Bridge for Contact Form 7 and Telegram plugin sends its messages to Telegram, but you create your own Telegram bot and connect it in the plugin settings.
The Easy Post web form fits when you have none of these, or no site yet. It is a ready form that you add with two lines of code or share as a link or a QR code, with no bot of your own and no monthly cap on requests, and it shows Easy Post's form instead of yours. If you collect answers in Google Forms now, the Google Forms comparison goes through the differences.
Where it gets stuck
- A test sent through the web form closes the "Still to do" panel, because the page cannot tell it was you and counts it as a real visitor's request. Nothing is lost: the link, the QR code and the code for your site stay in "Where people send submissions". This is why you link Telegram through the bot first. You can delete test requests under "Submissions".
- After Send, the visitor's page offers "Find out the result in Telegram", and you cannot hide it. On this setup nothing more arrives there: the bot confirms and goes quiet, because nobody approves or rejects the request. If the visitor presses it, their Telegram name appears next to the request under "Submissions".
- Visitors must tick a consent box before Send. It links to the privacy policy of easy-post.app, and you cannot change that link. If your site has its own privacy policy, mention there that requests go through Easy Post, or ask whoever wrote it to add that.
- The page shows its own words, such as Send and the consent line, in the visitor's browser language when that is English, Russian, Ukrainian or Hindi. Your questions stay as you wrote them.
- Spam protection is built in: a check that the sender is not a robot, at most 10 sends a minute from one address and 120 an hour for the whole form. You do not need "Daily Limit" and "Monthly Limit" in the form settings for this: they count per person and work only in the bot.
- If you switch the pipeline off, the form page stops opening, and the web form card says "On, but the pipeline is inactive: the page does not open".
- A PDF drawing or a spreadsheet does not go through: the photo question takes only JPEG, PNG or WebP up to 10 MB.
- On some plans the form shows "Made with Easy Post" at the bottom. The web form card names the plan that removes it.
Set it up in six steps
- Sign in with Google, pick "Bookings and service requests" on the first screen, press "Test the form in Telegram", press Start, then Start again under the welcome message, and answer the questions as a customer.
- Press "Form". Type your services into the Service buttons, keep Address and Preferred Time only if you visit customers or book visits, delete the photo question or rewrite it, and set up the contact question. Press Save under the questions.
- Change Form Name, Welcome Text and Completion Text, and press Save under "Submission Settings".
- Check that the "Web form" card says "On · taking submissions" (if not, press its switch), copy the code, put it in place of your old contact form and press Save, Update or Publish.
- Send a test request from your site and check the message in Telegram. Delete it under "Submissions" if you like.
- If someone else answers requests, add them under "Members" and have them link their Telegram.
Other forms for similar jobs: lead form, service request form and quote request form. All forms are listed by job in the guide to forms in Telegram.
New to Telegram bots? How to create a Telegram bot without code explains how they work, and you do not need it for this setup.